Showing posts with label Household Stuff. Show all posts

Tuesday, March 12, 2019

Three Hundred Ninety-Three Thousand Six Hundred Stitches


How do you measure,
measure half a year?

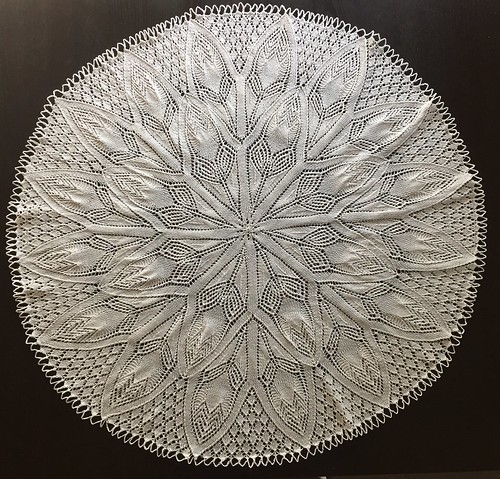
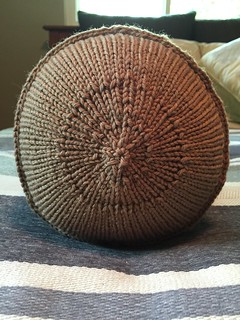
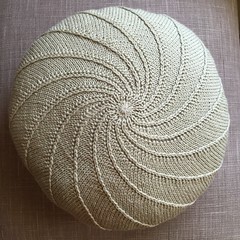
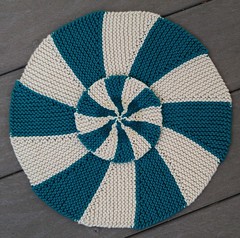
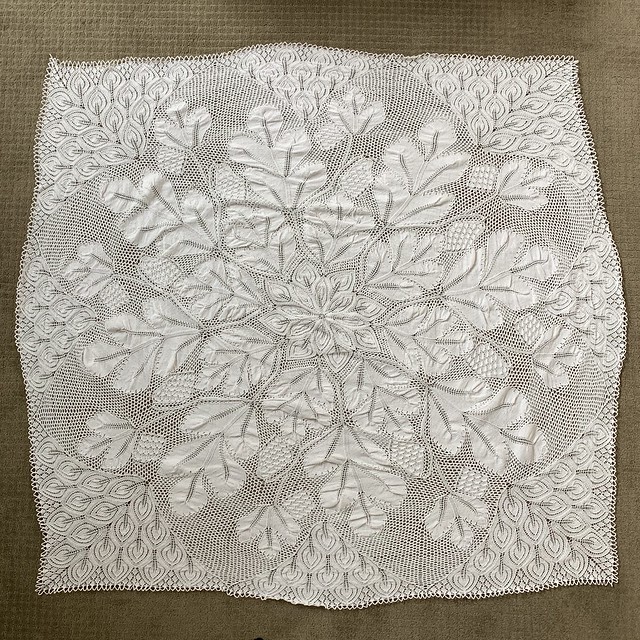
I finally finished up my Tannenzapfen tablecloth designed by Herbert Niebling this past Sunday. It was technically 393,636 stitches (not counting the crocheted bindoff edging) and took me six months and a day to complete. And there's over three miles of crochet thread in this thing.

I didn't post anything here about progress while I worked on this. When working on a stranded knitting or cables, or even plain stockinette, you can immediately see results and take joy in admiring what you've created so far. There are little milestones that allow you to take stock and reassess. But knitting lace is all about deferred dreams. After the first little bit, it's just a wad of holes sitting in your lap. It's hard to photograph, and nothing looks like it should. When it finally comes off the needles, you can see a bit of the potential, but you just don't have any sense of payoff until the blocking. And six months is a long wait for a payoff.

At first, I thought that the pine cone motifs, the tannenzapfen, would be the most interesting part. They were actually kind of a pain to knit. I ended up using thin crochet hook because I found knitting all those stitches together rather difficult. I do like how they look now, but it turns out I really like the large leaf-shaped portions best. They almost look like solid fabric next to the super-lacy double yarnovers surrounding them. They were the most boring parts to knit, but seem to me to be the most visually interesting in the end.

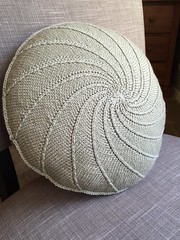
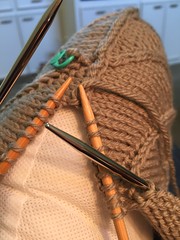
The instructions I used, a simplified and translated version from Doilyhead, said to simply bind off after the 405th round. But I wanted some sort of edging, so I worked out a system where by 11-stitch crocheted chains ended by gathering up 3 and 5 stitch sections along the edge. I worked a few of these into round 405, didn't like the way they worked with the previous round's yarnovers, and went ahead and added a 406th round of plain knitting. It looked much better. And after knitting 405 rounds, adding another one wasn't all that hard a decision to make.

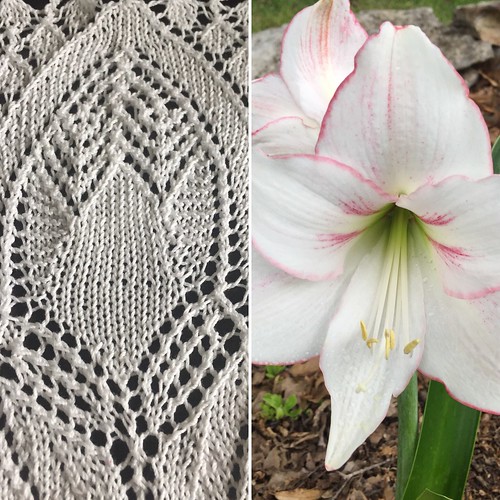
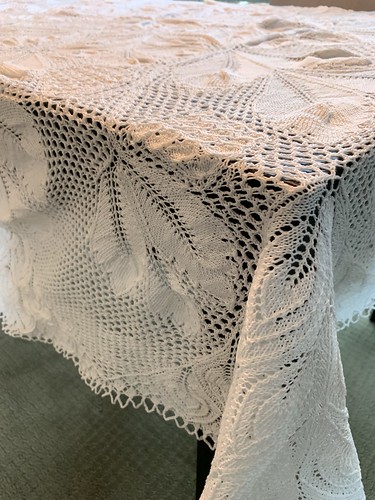
Blocking this thing is a bit of a bear. It comes from making something knit in the round turn out as a square, which only gets one to square-ish. If you look at the whole thing in eighths, you can see that the corners are where you add some extra stitches. But it still doesn't come out right. There are lumps in the leaf motif that I'm not super happy with. I wonder if ironing the leaves flat would make the tension move out to the double yarnover sections, which, being lacier, might relax and also lie flat?


There, of course, things I wish I'd done differently. I still had some of those plastic-y ring stitch markers which worked great as visual cues for the beginning and ending of repeat sections. However, at this small gauge, the ring was thick enough to create a noticeable gutter through some parts of the fabric, even in the double yarnover sections. I'm saving those for projects on bigger needles only from now on. I also wish I'd stuck with just the jumbo put-ups of Aunt Lydia's Classic 10 crochet thread. Toward the end, I thought I'd just need a regular ball to finish, and ended up needing more. I think I made five Russian joins as I moved from one ball to another during this project. I could have gotten away with just three if I'd planned better.

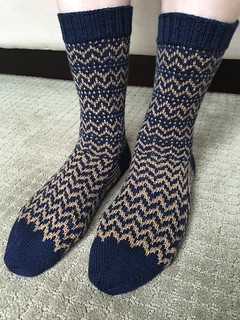
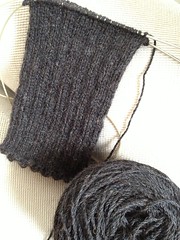
Immediately after setting this out to block in the afternoon, I picked up the socks I started at Zion National Park. I'd only just gotten past the gusset decreases on the first sock when I sat down. By the time I was ready for bed, the first sock was done. It felt so good to be knitting something else!

Sunday, April 29, 2018

Don't Dawdle, Amaryllis

Unlike Marian Paroo's piano student of the same name in The Music Man, this Herbert Niebling Amaryllis pattern seemed to fly off the needles. One month exactly from cast-on to blocking.

There's just something about the symmetry and pattern of lace knitting that I really enjoy. To start from just 8 stitches in the center, expanding outward in an expanding spiral that gets increasingly slower as you go. By the end, there were 960 stitches on the needle, with each round taking upwards of an hour to complete. And all done with one long piece of cotton thread and just a few a basic stitches. It's all so very satisfying, like putting together an intricate puzzle or constructing a complicated model. I really do like lace knitting more than I ever thought I would. And these Niebling patterns, while intricate and seemingly complicated, are really quite accessible to more knitters than you might think. They're definitely worth a try.

Detail of the pattern alongside my neighbor's Amaryllis
Unlike the two Herbert Neibling patterns I tackled last summer which were roughly oval-shaped (Georg and Flieder), the Amaryllis pattern is round. So there was no picking up of stitches to connect different sections -- just one giant spiral -- which was a lot easier. However, putting in life lines across so many stitches was a bit problematic - but necessary. A few times I found mistakes -- usually right after putting in a lifeline, but in each case I was able to figure out what I'd done wrong, ladder down the stitches, and re-create the pattern correctly. This is so much harder to do in lace than in more traditional stockinette knitting, but do-able if you pay attention to which row you are on. And if you're patient. And if the problems are fairly simple. I found that the surest way to avoid problems was to do a lot of counting as I went -- this left leaning section has 13 stitches on this row, the yarnovers in this direction always take place after 4 plain stitches -- that sort of thing. I have a tendency to do that in my head about all sorts of things anyway, so I kind of find it soothing.

Sample from Amaryllis pattern
This pattern can pretty much be done from the charts -- I didn't have to rely too much on the brief instructions in German that I'd run through Google Translate. There was one section I couldn't quite figure out, which features a small box near a place where the chart seemed to shift over. It looked like it read 5 M. z. , although it was a bit fuzzy. The key in the original pattern reads Maschen zurück d. h. so viel Maschen der folgenden Runde, wie die Ziffer im Zeichen angibt, auf die letzte Nadel der vorigen Runde rechts stricken. Google Translate kicked this back as Mesh back d. H. knit as much stitch as you want on the next round as indicated by the number in the symbol on the last pin of the previous round on the right. Even this didn't quite make sense to me (wish I could figure out what that d. h. abbreviation means - maybe something about the round marker?). I ended up removing the beginning-of-round stitch marker, knitting 5 stitches, replacing the marker and continuing. Seeing that visual 5 stitch difference between rounds 107 and 109 made me think this was the way to go. For the rest of that round, each of the 16 markers (one for each Amaryllis blossom) had to be slid over 5 stitches. It seemed to work. And that strange little 5-stitch section of stockinette has no effect on the entire piece, or course. Not sure if this is what Herbert intended, but it's what happened.


Blocking this thing was a bit of a bear. I used my thinnest blocking wires and ran them around the outside through every other gathering of stitches at the base of each of the 224 edge points. Then I bent them gently into arcs and tried to get a uniform diameter. It ended up varying between 32" and 33" inches across. Sadly, one of the blocking wires bent permanently. But I was able to get it more or less round. Then I needed to pin out the points. I used all of my T-pins and a bunch of yellow-headed pins that I'd gotten at some point. I still had about 50 points to pin. I found a package of safety pins and opened up each of those. Then I grabbed 8 pins from a shirt I'd just bought and unwrapped. Still two short, so I grabbed some cork board push-pins. Whew. It was close. Janelle told me that T-pins make great stocking -stuffers. Just sayin'. While it was damp, I sprayed the whole thing with spray starch (need some more of that, too) and by the next morning it was dry. I love that swishy sound it made when pealing the stiff cloth off the blocking board. Since removing it from the pins and wires, it has tended to gather in a bit and won't lie quite flat. I think it would work better if it were draped over a small table. Still not entirely sure what this tablecloths ultimate fate will be. But so glad I made it.

What's next? More lace, I think. But brightly colored. And much softer... Thanks for stopping by!

Sunday, November 27, 2016

Warm Head, Warm Heart


After getting some big projects finished, I've been able to focus on some smaller, more quickly completed projects lately. Since last posting, I've made two hats. The first, above, is the Fimmel Hat, part of a kit (#2) from Dale Garn North America that was gifted to me. It's 100% alpaca, so it's quite warm, but it has a bit of a mohair-fuzzy halo to it, something you don't usually get when using regular sheep's wool. The stitch definition has a bit of a haze to it as well, although that might have has much to do with the tension issue I had with this as with anything else. There is a matching set of fingerless mitts that compliments that hat and uses many of the same motifs. I have enough yarn to knit them, so I might give them a try. But what is the one size of DPNs I need for this project? US Size 4. And what is the one size I don't have. Jeff doesn't believe me when I tell him this.

While this is a really cool hat, it's not for me. I'm thinking of donating it and the accompanying mitts to my family's summer reunion silent auction.

    
The second hat was also from some gifted yarn. It's the Mendia Hat by Ambah O'Brien, made with Madelinetosh Tosh Merino DK in the Whiskey Barrel colorway. This yarn makes knitter look so good! It's a fun fast knit, with a lace chevron pattern through the middle -- which I had to do over three times to get right. If you follow the pattern thoughtfully, you get a chevron pattern. If you think, "meh -- I know what I'm doing," you get diamonds. I did this twice.

I worried that my pale, bald head would look weird through the lace holes, but the fabric is pretty thick due to the twisted stitch ribbing, and it doesn't look bad at all. I made the large size in the slouchy version. Not sure if I can carry that off, but I really do like it and it is super warm. I'm wearing it right now in my house, hoping it will bring on the cooler weather.


And now for the warm hearts.

Jeff and I have been out of town for the last several Christmases, so we haven't bothered putting up a tree. Which means this is only the second time I've gotten to use the julekuler ornaments that I made in the summer of 2012.

We usually put up our tree (yes, it's artificial) on the Sunday after Thanksgiving. We had a great time with his family in Fort Worth and Dallas this weekend, but were eager to get home to start getting our house in shape for Christmas. We spent the morning listening to jazzy yuletide tunes, setting up the tree and getting things decorated in general. It was a relaxing end to a fun weekend. As usual, getting ready for Christmas brings back a lot of happy memories, and has it's therapeutic properties, too. I'm really looking forward to all the friends that will be visiting us this year.

And finally, when Jeff's cousin invited us up to Thanksgiving at her house (which was amazing, of course), she sent this photo of her daughter, wrapped up in the Tamarix Quilt (really a blanket) that I knit for her when she was born. I can't believe that she's nearly six years old now. I also can't believe that this is still one of her favorite things -- and that it has held together so well. Apparently, it's a nap-time essential for her. It was so great to see her this weekend playing with her little cousins and seeing how much she's grown up.

I'm really enjoying this holiday season so far, and it's only just getting underway. Here's hoping we all have a wonderful end of the year, full of hope, beauty, and the promise of good things to come.

Saturday, July 25, 2015

We Come 'Round Right

I'm going to be attending a reunion of my grandmother's family, the Weavers & Armstrongs, next weekend. She was one of eleven children, so as you might imagine, it's quite a crowd. My early memories of summer visits to Texas involve this reunion, and being greeted by dozens of people whom I'd never met, but who all seemed to know me and my place in this large group. It's a day for warm memories, great food, bad jokes and just catching up. I love it.

To raise money for renting the space and catering some of the food, relatives bring handmade items to be auctioned off in a silent auction -- or maybe not so silent -- we are talking about Weavers here. Items can run the gamut from preserves and jams, to handmade quilts and wooden toys, My contribution this year is a set, or possibly two sets, of Shaker Dishcloths as designed by Staci Perry at VeryPink. I made some versions of these in placemat and coaster sizes a few summers back.

Because I went rogue and chose a different yarn than the pattern called for, I had to make an adjustment. This yarn, Cascade UltraPima, while beautifully shiny, is a bit on the thin side for this project. This picture shows what was going on -- a strange gappiness right before the color change, most noticeable in the white (see photo). I tried going down a few needle sizes, but didn't like that. I settled on wrapping the slipped stitches, like one might do on a short row heel on a sock. Then I tweaked things even more by twisting the wraps just before knitting them together with their accompanying stitches. This added a bit more density to the final row, but I preferred that to the weird laciness I was seeing.

In other projects, I'm working on a pair of ombré socks using the Crazy Zauberball yarn I got in Pennsylvania in May. I love just working the 2x2 ribbing. You can't really get a matched pair with this yarn, but I did at least want to keep the patterning a bit more symmetrical, so I'm going to use afterthought heels in solid black. The toes, too. That way, even though they'll be striped quite differently, they still have the same heels and toes and look a bit more like a pair. That's the plan anyway. We'll see how that pans out.

Sunday, July 19, 2015

The Braid-y Bunch

I finished what I think will be the last installment of my knitted pillow project. If you've been following along at home, I was originally going to make three, but a gauge problem saw me buying an extra (smaller) square pillow form, so I just had to knit another. And the extra pillow ended being the Celtic Knit Aran Pillow, finished this afternoon.

I loosely used a pattern that appeared in Canadian Living that I saw on Ravelry -- with some modifications. The pattern says it makes a 16"x16" pillow. I had a 14"x14" form, so I went down a needle size (US 6, 4mm) and trusted that the worsted Cascade 220 I was using would be a bit thinner than the Aran weight called for in the original. And it worked. The original also called for a split back with buttons But I didn't like how all the examples gapped around the buttons in the back. This can be fixed with a bit of ribbon, but the whole thing was shaping up to be way more fiddley than I was in the mood for. Ain't nobody got time for that. I was mostly interested in the braided Celtic knot motif, anyway.

After getting 14" of the cable pattern finished, I continued knitting plain stockinette for another 14". After blocking (see right), I used an invisible horizontal seam to join the top and bottom. I don't know about you, but mine are always quite visible. Perhaps I tension the yarn too tightly? Then I just seamed up the sides. Just before sewing up the final side, I found a place on the back where I hadn't caught all of the yarn and it looked quite weak. To reinforce things, I darned a bit of yarn across this spot on the inside. That was close. It's a little noticeable when you rub your hands over it, but not too bad.

So what was originally meant to be a series of quick springtime projects dragged quite far into the summer. I'm overall pretty happy with how these turned out, even if I'm not so sure about the colors going together. I've never really trusted my color sense -- and it doesn't help that I'm drawn to grays and browns. But I think they'll do. In any case, Pona seems pleased. I hope he lets me enjoy looking at them for a while before he chews them up. I can almost see the wheels spinning in that tiny little head of his.

Next up -- yet another pair of socks.


Wednesday, July 08, 2015

Buttoned Down

Who's got the button? Me -- and two of the pillows I recently knit.

I'd been fretting about buttons for these pillows, especially the round Spiral Galaxy Pillow, for some time. I looked for a fancy glass button at the Maryland Sheep & Wool Festival this year, but couldn't find anything I liked. As I thought about it, I decided I wanted it too look like those old shiny, silky pillows my grandmother had in her living room, with a button out of the same fabric. Something to draw it all together, but that wouldn't steal the show. For the just-completed Smocked Rib Stitch Pillow, I needed buttons to rein in the end caps, which were being pushed out by the pillow form and were decidedly nipple-ish. Not a good look.

Knitted buttons made from the same yarn as the pillows themselves would be the way to go. So while running errands this morning, I stopped by Bolt Fabrics and got some Dritch cover button kits and heavy upholstery twine. The salesperson was so helpful to walk me though the process. It was pretty obvious I was in over my head.

Based on our conversation, I realized that my knitted covers would be too thick to snap on the backs. Kindly, Jeff sacrificed an old brown t-shirt so the buttons would have a base that wouldn't let the metal shine through. Then, I knit some small covers using matching yarn and constructed as follows:

  • Cast on 4 stitches
  • Purl a row
  • Increase one inside each edge stitch every right-side row until 12 ston needle
  • Make two rows plain
  • Decrease one inside each edge stitch every right-side row until 4 st on needle
  • Bind off

I ran the tails through the inside edge of every other selvedge stitch around the edge and drew the cover in tightly. And, voila -- a knit-covered button!


I found some instructions on sewing buttons on pillows and away I went. Drawing the thick twine through the long pillow was a bit of a chore, and upholsterers would probably have a special tool for such purposes, but I can report that a seaming needle, squishing hard and grunting can work in a pinch.

Way easier than I thought it would be and I'm happy with the results. Now, I have one more naked pillow form to get covered...

Sunday, July 05, 2015

Smock and Awe

A flash of genius and a little help from my friends helped me all but finish my Smocked Rib Stitch Pillow this weekend.

I had some real hiccups with this, mostly because I was making it up as I went along. The crochet provisional cast on worked, but it didn't unzip correctly. Which I should have anticipated if I'd thought a bit harder about it. Flipping the yarn back and forth over the chain to k2p2 meant pulling all the yarn through a loop every other stitch when trying to remove it. What should have taken 3 seconds ended up taking an hour.

Then I tried to focus on seaming the thing together by grafting the 2x2 ribbing. Staci has excellent instructions for doing this, but I just kept messing it up. I have regular stockinette Kitchener grafting so stuck in my head that I couldn't get the rhythm. And the squished together stitches made it hard to see what I was doing. I must have started and stopped four times. I grumbled about this with my knitting crew, and they convinced me that a 3-needle bind-off would work just fine. And they were right. Not totally invisible, but not too jarring. And it's a tube, right? The seam can always be rolled out of view.

The part I was on my own with was the end caps. I wanted round pieces, which aren't the easiest thing to do in knitting. I toyed with the idea of crocheting round pieces, but thought the styles would be too different. So I went with Elizabeth Zimmerman's pi method, wherein the number of stitches is doubled after the number of rows has doubled. I'm sure I learned some theorem or proof about this in Mr. Ashorn's geography class back in high school, but if so I've since forgotten. The basics are:

  • Start with 8 stitches
  • Knit a round (2 rds) then double the no. of stitches (16 st)
  • Knit until 4 rds from previous increase then double the no. (32 st)
  • Knit until 8 rds from previous increase then double the no. (64 st.)
  • Knit until 16 rds from previous increase then double the no. (128 st)

I ended up knitting one more round just to tidy things up. The 128 stitches around the end panel happened to be only four fewer than the 132 stitches on the selvedge edge of the tube -- 11 repeats of the 12-row motif. I didn't plan this -- math, geometry, gauge and tension just worked out in this case. I couldn't have planned it.

Then I needed to figure out how to get this attached. I had live stitches on the end pieces, which needed to be both bound off and attached, so I did what amounted to a combination gusset pickup and bind off. I put the needle through a live stitch on the end panel, grabbed yarn through a selvedge stitch from the tube, pulled it through both, then bound it off on the next stitch. This created a nice exposed crochet chain edge, that was almost one-for-one between the two pieces. Every 32 stitches I skipped one and the count lined up perfectly.

The first panel was easier than the second, because I had to have the pillow form stuffed inside for the latter. And I don't think I'm quite done. The form poofs out a bit on the ends, making the pillow look like one of those canisters you put in the pneumatic tube at a bank drive-through. I'm thinking of pulling them in with some upholstery buttons.

I like how the smocking pattern makes it look like the pillow is covered with dragonflies when viewed at the angle in the first photo above. Very appropriate now that our sultry Texas summers seem to have finally arrived. Hope you're enjoying your summer as much as I am!


Sunday, June 21, 2015

Socks and Smocks

Uh, hi.

A topsy-turvey work schedule, along with a professional meeting, a chorus concert, a mini-vacation and getting the interior of our house painted, have all conspired to make knitting a rare thing lately. For weeks all I did was work on a pair of socks on Saturday morning with my regular knitters. That was it. Two hours a week for nearly a month. And it really bugged me. But this weekend I dusted off the cobwebs, literal and figurative and mental, and resumed some semblance of momentum.

Yesterday, I finished the Moorish Stripe Socks, one of the Six-Stitch Stranded Patterns from Charlene Schurch's More Sensational Knitted Socks. I used the yarn I bought at The Quilted Skein in La Grange when I visited with Leah Wilson King back in March.

I think these turned out fine. I did do the gussets differently on each sock, a danger when the two are knit so far apart. You can see the one on the left above has a gold line on the top of the gusset that the other doesn't have. I also managed to repeat an extra row on the sole/instep of the second sock, but didn't catch it unti just before,working the star toe. Oh, well. I'm over it now that I've confessed. My sock model, who normally doesn't go in for handknit socks, declared these "wonderfully soft" and that he wouldn't mind a pair like these. Maybe it was because the gold color has silk in it? He better not hold his breath. It may be a while before I tackle stranded knit socks again.

After completIng that pair, I started right away on another installment of my knitted pillow project. I'd toyed with the idea of a honeycomb cable for a bolster pillow, but wasn't sold. Staci suggested I take a look at a smocked rib pattern that she'll be posting an instructional video for soon. She graciously sent me the instructions and I've set to work. The idea I have is to knit this with a provisional cast on so that I can graft it closed once the tube is the right circumference. However, this means that I had to both knit and purl into the provisional crochet chain. No easy feat, that. I had to use a tiny crochet hook to help get the purl stitches on the knitting needles. And it took forever. And I have to find instructions for grafting 2x2 ribbing. I'm sure that's a thing (he said, without ever having checked).

But it's going well now. All the fiddliness happens every six rows, way better than what I would have faced with honeycomb stitch. And I like the pattern it makes. It reminds off the gathered fabric I've seen on top of old sewing boxes.

So something finished and something started. Here's hoping that my slump is over.

Sunday, April 19, 2015

Spiral Galaxy Pillow

I finished up the second installment of my springtime throw pillow project today. Or at least I think I have.

This pattern knits up much faster than I thought it would. And used much less yarn. It's a pretty simple three-round pattern. Increases happen in every one of the 15 segments on each round, but decreases happen in only two out of three rounds. This makes the spirals fan out in a rather gradual manner. Basically, you just keep this up until there are 17 stitches in each segment. Oh, and then you do the whole thing again for the second side, of course.

Putting it together started out rather tedious (I had 255 stitches to bind off), and then, about halfway round, descended into downright chaos. The two sides are joined with a 3-needle bind off. Usually, this is done on the wrong side of the work. But since you can't really knit on the inside of a soon-to-be enclosed space, this seam is exposed. About halfway around, I put the pillow form in. And then I happened to look down to see that I hadn't quite caught one of the stitches on the backside about 20 stitches earlier (caught with a greenish clip stitch marker in the picture). So I had to unseam backwards, while trying to keep the building pressure of the pillow form from popping the edge stitches out. I grabbed some DPNs to assist in corralling everything back together. I wanted to yell "clamp!" Like some surgeon on TV. Instead, I stopped for a few calming deep breaths and a picture before moving on. Disaster averted. Did I mention that the cables have started separating from the old Knit Picks interchangeable needles I got that when I first started knitting? That also involved over 40 dropped stitches and dropped profanities...

But all's well that ends well. And I think this is mostly finished. I still think this needs a big fat decorative button in the middle. I bought some wooden ones that I thought might do, but they're clearly the wrong type. They need to be the kind with the securing ring behind, not with holes visible from the front. And the yarn I have won't be able to withstand the springy force of this pillow form. So I'm thinking of taking it to an upholsterer for some guidance -- or to perhaps just do it for me. I'm not proud.

So, two pillows down -- one (or maybe two?) more to go. And I need to get back to those Moorish Stripe Socks.

Sunday, April 12, 2015

Stripes and Spirals

The flowers are blooming, the weather is warming, and I'm entering into my annual springtime knitting slump. I still have projects that are grabbing my attention, but I just don't seem to have enough time to do much knitting. Plus, the looming warmer days put me off the idea of handknits. I'll get over that soon, I'm sure. In the meantime, I've made some progress I can share.

It may be a bit premature to post this, but I finished the first of the Moorish Stripe Socks. There were options for knitting pinstripes into the heel flap and the toes, but I decided for solid navy. As Tim Gunn might say, these socks are already "a lotta look," so having three solid patches gives me eyes a chance to catch their breath. I know I'm confusing senses and mixing metaphors there, but you get the idea. The hard part for me was realizing that the pattern across the instep is meant to be continued as if the gusset wasn't there, so that when the gusset does eventually draw together, it just disappears into the pattern. I didn't get that at first, overthought things, and ended up having to un-knit a few rounds to get back on track. Such a lot of fuss for something that will be covered by shoes most of the time, right? Now to cast on for the second one and do all this all over again before Second Sock Syndrome sets in.

I also got started, yesterday, on the second of my pillow projects, the Spiral Galaxy Pillow. I needed something round that would knit to 16". This one is scalable out to nearly any size, really. It's designed by Daniel Yuhas, appears in 10 Secrets of the LaidBack Knitters, and came to me through the magic of Interlibrary Loan. Thanks, Dallas Public Library!

It's knit from the center out and is pretty simple to follow. Except for the instructions about slipping stitches and moving markers around. I overthought those, too, starting over three times before figuring out that keeping the same number of stitches between the 15 spiral segments is really the goal here. The first side is about 10" across right now. I still have quite a bit of yarn left, but I also know that it gets eaten up faster and faster as the circumference grows. I'm thinking of putting a big button right in the middle of this. Maybe a big wooden one? Or maybe a knit-covered one?

Not to let sheep out of the bag, but as it happens, I have a little trip planned soon that will surely shake me out of my spring slump. More on that later...

Sunday, March 22, 2015

Spring Break Squared

Turns out my college's spring break framed my latest knitting project from start to finish. I cast on just hours after getting home a week ago Friday, and finished sewing up the seams this morning. I'd been wanting to make some cabled pillows to match our duvet cover and had bought yarn in colors I liked in January. Then I got side tracked making toys and socks. But as spring break loomed I found a pattern with cables I liked -- the Christmas Cables Pillow.

The only thing that read "Christmas" about this was the red color, but I had to change a bit more than my mindset to make this work. I had already bought some pillow forms, and didn't have one in the 16" square size that the pattern was designed for. I "knew" I had a 12" one, so I swatched carefully with the needles and yarn I wanted to use and reduced the number of horseshoe cabled from 6 to 4 to get close to a 12"x12" square pillow and set to work.

It's really an easy pattern to memorize. The edges have a cable motif that crosses stitches on every right-side row, and the larger horseshoe cables only cross every eight rows. The whole thing is made in one long piece and then folded over the pillow form and seamed on three sides.

I worked along until it was a little over halfway done and then grabbed the pillow form to see how things were looking. The form that I'd had in mind (and now had in hand) was for a 14"x14" pillow. Sigh. For a while I played with the idea of just stretching the hell out of it during blocking, but figured it would just look too stretched and strained. The cables would have been distorted beyond recognition. So I bought a new 12"x12" form. And, looking on the bright side, I now have an additional pillow size to experiment with. Not exactly a win-win situation, but close.

The new pillow turned out fine, with just the right amount of stretch across the form. The edges of the pattern have built-in knit column runways perfect for mattress-stitch seams. And I was able to line up the cast-on and bind-off edge stitches so that they flow into each other on the final edge seam -- it doesn't look that different from the opposite, folded-over edge. I only had one cable snafu, but it wasn't too difficult to rip back and get on the needles, even without a lifeline. The looser-than-usual gauge helped with that.

So now, I get to troll around for some new pillow patterns on Ravelry. I have a 16" circular form (yes, I just double-checked the size!), so I think I'll tackle that next.

Wednesday, August 20, 2014

Treasure Post

I received a letter in the mail his summer, which, while delivered in July, only now just made its way to me. It's wonderful beyond words and I just have to share.

I signed a short contract last academic year, and was away from work for most of July through this week. Getting back to the library after a break always involves a flurry of returning calls and going through email. It was halfway through Monday before I tackled the physical mail, and amongst the junk mail and magazines, I found a letter. A proper letter, with a stamp on it. The stamp featured a profile of Her Majesty and was postmarked Glasgow. What could it be?

An envelope of awesomeness, that's what! A Glaswegian Ravelry friend, Alison, had attended the Edinburgh Fashion Festival in July and got to meet Arne & Carlos, the Norwegian designers of the 55 Christmas Balls which I made two years ago. Alison thoughtfully printed out a photo of my completed set beforehand, and asked them to autograph it for me:

I can't tell you how wonderful it was to receive this. Alison sent it to me with a warm handwritten note. I'll treasure both, I assure you. And she was very resourceful in finding an address to mail it to. The librarian in me appreciates such skills. That someone I've never met would think of me and go out of her way to do this for me was truly touching. I will be sending her a proper thank you later, you can be sure of that.

If you want to see her great knitting (and yes, you do), Ravelers can find her under the handle banjocool on Ravelry. I especially like the small-gauge knitting she's done for Barbie and her Action Man!

Thank you so much, Alison. You really touched my heart with this gift.

Monday, August 05, 2013

Shake It Up

I got to work on them off and on during our British Columbia vacation, and this morning I finished up the Shaker Placemats and Coasters. And though the pictures may not do them justice, they are, well, rather vivid. You could say gaudy and you wouldn't be far off. I'll stay with vivid. We'll probably use these for outdoor things, mostly. They're a bit much to have to stare at every day. Are you getting dizzy yet?

Each color was chosen to coordinate with, if not exactly match, a different color of our Fiestaware dishes. We chose yarn colors that were as close as possible to -- clockwise from the top -- Tangerine, Chocolate, Pearl Gray, Cinnabar, Turquoise and Plum. We use these as our everyday dishes. Both of us had grandmothers who had Fiestaware and we still have some of those dishes around. I'm hoping they are of the non-radioactive variety. Don't worry -- we don't use those.

My Grandma Self used Fiestaware all the time, although I only remember four colors -- orange, yellow, green and turquoise. Jeff's Nana had quite a few more colors. Grandma always set her table so that all the settings had the same color dishes. If you were sitting in front of a yellow plate, you'd also have a yellow bowl and a yellow coffee cup and saucer. That's the kind of person she was. She liked her order. So when deciding how to take pictures of the placemats with the plates, I had to do make one Grandma-style.

This drove my mom, Grandma's daughter-in-law, nuts. Mom always thought that the point of having dishes in a bunch of colors was so that you could mix and combine them in interesting and eye-pleasing ways. It was always fun to watch as they set the table while getting breakfast together. I think it was my great-grandmother who first pointed this dynamic out to us kids, and we'd giggle with her as my mother and grandmother surreptitiously moved plates, bowls, cups and saucers around like some strange version of chess.

I'd give anything to be able to sit down to breakfast with those three women again.

So, what would be your preference? Matchy-matchy Grandma-style or my mother's rainbow approach?

Monday, July 22, 2013

O Canada!

Jeff and I are on vacation, traveling around British Columbia and a bit of Alberta. We're having a marvelous time, after a rocky start that got us into Vancouver at 2am, or 4am in our CDT heads. The people we've met couldn't be friendlier, and there are beautiful sights around every bend. I haven't gotten to knit as much as I'd like since I'm the designated driver, but I have squeezed some in here and there. Mostly yesterday.

Yesterday was when we took a 15-hour ferry ride -- mostly in daylight this time of year -- from Port Hardy on the northern edge of Vancouver Island to Prince Rupert, just a bit south of Alaska's southern tip. It started out foggy, but soon the weather cleared and I got to sit on the sun deck, knitting and watching for orcas, humpback whales, and sea lions -- all of which we saw. The Inside Passage through the coastal islands is quite narrow at times, and it was amazing how close we sailed to the shores on either side. What a way to travel.

As far as I could tell, I was the only person knitting on the ferry. I didn't get the odd stares and questions that I often get as a guy knitting in American airports and like situations. I finished up a coaster and completed a placemat in the bison color. Once I finish its accompanying coaster I'll be ⅔ done with this project. I'm not sure if the Ivory yarn I have will hold out, but it just might.

Tomorrow we head for western Alberta and the Canadian Rockies for some hiking. It'll be good to get away from the car for a few days to stretch our legs. Oh, and at the risk of drawing the ire of my fellow Texans...

I've been wearing jeans. Outdoors. In July.

Saturday, July 13, 2013

True Simplicity

I'm fascinated by the Shaker sect and the influence it has had on American culture. Their music, furniture, architecture, agriculture -- all undertaken with a mind toward worship through simplicity. Although they believed in equality of the sexes from their 18th-century founding, they also had some weird ideas about lifelong celibacy. I guess no cult is perfect. Several years ago, Jeff and I stayed a night at the restored Pleasant Hill Shaker village in Kentucky. It was absolutely beautiful. I could have spent much longer there than we did. We loved everything about it. Well, Jeff didn't exactly care for the Shaker Lemon Pie.

My friend Staci, creator of the helpful VeryPink video tutorials, has just released a pattern for Shaker Dishcloths and Coasters, created from a description of similar items in Richard Rutt's A History of Hand Knitting (p. 205). I wanted some colorful placemats to go with our colorful dishes, and I figured I could adapt the dishcloth design a little larger to get what I needed. I'm planning on making 6, in the colors shown in the last post. This picture shows the first attempts. They haven't been washed yet.

Such a cool pattern! Nothing too complicated, and after I got used to how the stitches are supposed to look on the needles I found I wasn't constantly glancing at the pattern anymore. Although this pattern does represent true simplicity, the knitter should pay attention and read it through carefully. There are some unusual techniques that have to be followed in order for these to work. If you don't like working short rows, then this probably isn't the project for you. But I urge you to try it. You may just find that:

To turn, turn will be your delight
'Til by turning, turning you come 'round right.

Posting may be erratic for the next few weeks while we are on vacation. But I will try to visit a yarn shop or two since we'll be in a place where knitting is appreciated, if not downright necessary. Stay tuned.

Wednesday, July 10, 2013

In High Cotton

And sheep's wool, and alpaca, and mohair...and a little bit of acrylic.

Casting about for things to knit after finishing the sweater last week, I decided to make some socks. I had originally wanted to use some yarn I got at the first Sock Summit in 2009 that I'd never gotten around to using. It's a Jacob/alpaca/mohair fingering blend from Toots LeBlanc -- perhaps my favorite name for a yarn company, ever. I'd originally planned to make some fancy stitch pattern from one of Charlene Schurch's books, but I quickly realized that this yarn didn't want to be knit up fancy.

It has a delicate appearance in the hank with whisps of mohair creating a fuzzy halo, but this ain't no 50's fuzzy sweater yarn. It's tough. Downright bullet-proof, even. So I'm opting for a plain 3x1 ribbed sock, using my standard recipe of 72 stitches cast onto 2mm needles. This yarn is kind of splitty and plied in a Z pattern (as I learned from Janelle), so I feel like it's fighting me all the way. We'll see who wins out.

Also on the horizon is a cool pattern for Shaker dishcloths and coasters created by my friend Staci, along with the usual helpful video. I'm thinking of making the dishcloth pattern a little bigger so they can be used as placemats. We'll see. I got the Knit Picks cotton/acrylic blend that Staci used in the mail today, in colors that I hope will go with some of the colors of our Fiesta dishes. The top color, Ivory, will be used for all of them in combination with the others, clockwise: Marina, Seraphim, Pomegranate, Carrot, Bison and Blackberry. As you might notice, the white balance on my camera is all jacked up. But hopefully, you get the idea. Can't wait to get started!


Sunday, December 02, 2012

In Fine Trim

Today was the day to get the tree set up and see what it looked like with all those balls I made during the last year. It is beginning to look a lot like Christmas, even though it doesn't really feel like it. It's close to 80°F outside.

We have a rather tall artificial tree that fits neatly in a smallish corner. I really miss the fine trees we used to get as a kid growing up in Washington, but taking into consideration our mild central Texas winters and the tendency for Jeff and I to roam over the holidays, an artificial tree just makes more sense.

This year the decorations consist of the 55 balls I knit earlier this year and some toy-themed ornaments that are partly from a trip to Germany and partly from a cheap drugstore set from my first Christmas in my own home, which has a lot of sentimental value. I think they all work nicely together.

I'm having a hard time getting decent pictures of the tree with my phone. I don't want a washed-out flash picture taken at night, and the bright sun is causing its own set of problems. But I just glanced over at Kate, napping on the couch after a long day spent outside napping, and managed to capture the photo above. Then, while writing this post, Pona decided to pose as well. It's like a Yuletide basenji opium den around here.

It all looks better than I'd expected. I just hope I put the new balls high enough up on the tree so that Kate doesn't snatch any of them.


Wednesday, August 22, 2012

55 Christmas Balls

The original plan was to have these done shortly before Christmas. Okay, so I'm a little ahead of schedule!

Last night, I finished the last ball, Thirteenth Day Kari. I'm kind of surprised at how quickly this project went, although, like many projects, I did tend to tackle it in bursts. Once i had the main pattern down pat, I could almost do these in my sleep. The main thing I needed to know was what row the contrasting yarn started on, and then I could just take off. The last one I did was finished in just a few hours. As I wrapped this up, I thought about all the possibilities for making one's own designs that would fit inside this format.

I have my favorites. The snowflake patterns from the beginning of the set still captivate me. I find myself drawn to the ones with traditional patterns and motifs over the ones with figurative themes -- although that squirrel is darned cute.

I'm glad I used beads rather than gluing on the crystals. One summer of storage in a hot Texas garage, and I would have had a box of ornaments sitting on a bed of rattly sequins. But I do think that maybe I overdid them a bit on a few of the designs. Towards the end of the project I found myself wanting to use them less and less. Still, I can't wait to see if they sparkle as much as I hope they will once they are on a tree with lots of lights.

I used the examples in the book when determining what colors to use. Hence the red and white (plus green in one instance). I've always liked the idea of a limited palette for decorating a tree, and I thought, "here's my chance." Jeff suggested I do some of them in a navy or dark green color, which I agree would look nice -- and some day I may get around to doing that. I'm not averse to the idea. In fact, there is a picture of a tree with 1300 julekuler on it in many colors that looks quite fabulous. For now, 55 is a nice number.

Thanks for following along as I made these. I can highly recommend them as a project. Now all that remains is one more set of pictures, but those will have to wait for later in the year. Martha was kind to point out that there are similar Advent and Easter projects designed by Arne & Carlos and some of the designs look really cool. I probably didn't need to know about this!