Wednesday, October 30, 2013

Cowtown Crawl

Several of the crafty medical librarians at the conference I attended this week spent our last morning in Fort Worth visiting a few of the local yarn shops. Dena, an excellent knitter and hospital librarian was our host and skillfully guided us around a city that seems to have become one giant construction site.

We started out at Jennings St. Yarns, which I had visited a few summers ago. We were among the first customers on a drizzly day, and the shop owner, Linda, made all four of us feel right at home. A large portion of the shop is set up by yarn color, rather than just by brand, which makes it easy to make serendipitous finds. I really like this approach. There was still a separate sock yarn section, thou, and with a lot of variety. I found some that caught my eye.

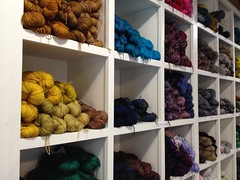
Then we were off to Madtosh Crafts. Wow! It's a large, roomy shop that's half Madelinetosh yarn and half quilting fabric. I loved how the yarn cubby-holes were all waist high and up -- a tall person's yarn shop, indeed. I saw many examples of popular patterns knit up in Madeline Tosh yarns (including a Honey Cowl, Janelle!), and for a,guy who leans toward the drab and dreary, I still could have spent the whole day looking at all the rich, bright colors. I chose some beautiful sport weight Madelinetosh 80-10-10 in a seafoam green color for a Willow River shawl that I've been wanting to make.

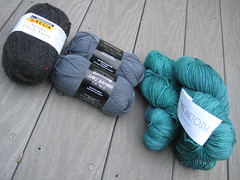
I got back to Austin with just enough daylight left to snap a quick picture of the stuff I got. My thanks to Janna, Helen and Dena for a great morning. And to Dena especially for being such a good guide. Here's hoping everyone got home safely today and is knitting their new yarn up soon, if not already. I think I'll get started tomorrow. I'm itching to, because I realized I didn't manage to knit a stitch all week during the conference.


Tuesday, October 22, 2013

Green Redford

I finished the Redford Sweater today. And I'm mostly happy with it. There are a few style and fit issues, though, mostly of my own creation.

When I last posted, I was in the midst of seaming together some of the pieces. I'm not entirely sure why, but I noticed a real difference between the tension in the knit and purl slipped selvedge stitches. This resulted in half the expressed seams appearing neat and tidy, and the others half looking a little, well, sloppy. I really noticed this in the seaming process itself. On one side, the bars I was trying to pick up were nigh on impossible to find. On the other, they were quite apparent. I need to look into why this is. I'm hoping it's just one of those knitting facts of life, and not some personal failing. One of the less tidy seams is shown in the photo below.

Also, I didn't attempt to match up the seaming ratios between the two sleeves. I just kind of eyeballed how to set them in. I used clips to keep everything proportional around each sleeve seam, but I didn't compare the two sides. And it shows. One of the expressed side panel seams ends about an inch higher than the other. Yikes. You may be able to see what I mean in the first photo above. I really should have checked as I set in that second sleeve. But I'm not going to redo it. The fit is fine, and I doubt anyone will notice. Except you, dear readers, now that you've read this. If you see me wearing this on the street, be kind.

More seaming notes: Unlike the sock yarn I used for the side seams, I used Loft to seam the shoulders, since these seams would be visible. It's really difficult to use this yarn for a sewn seam, since it has little tensile strength. It kept breaking, with the result that this sweater is held together with spit as much as wool. Too much information? Also, the instructions didn't explicitly state that the sleeve seams (they're knit flat) should be expressed, so I chose to seam them normally, on the inside. While the expressed seams are an interesting feature of this pattern, my lack of skill with the edge stitches made me wary.

Please don't let this post give you the idea that I'm unhappy with this pattern or it's results. It really is quite lovely. I love the color and the weight. I was comfortable in it in the shade on a dry 24C autumn afternoon. It is a bit short for my taste, but that's how the pattern is written. If you like your sweaters a bit longer, adding some rows would be an easy modification. All in all, I'm pleased with it, and can't wait for the crisper days ahead when I'll get to wear it more. And I'm glad it's finished. Now, on to other things.


Saturday, October 12, 2013

Seam Antics

All parts of the Redford Sweater are knit up! Last night I blocked everything and today the seaming begins. This could take much of the weekend.

Tony expressed interest in how I was going to join stockinette and reverse stockinette. I was curious myself, having never attempted this maneuver. It's made even more complicated by the fact that the seams are supposed to show, that is, they are expressed, on the right side. I mulled things over, got out my copy of Vicki Square's The Knitter's Companion, and mulled things over some more. It shouldn't have taken so long, but I finally realized that in order for the seam to show on the right side, I had to sew the seam on the wrong side. Simple enough, once it occurred to me.

Above you see the wrong sides. The front panel is on the left half of each photo, showing the reverse stockinette side, and a side panel is on the right half of each photo, showing the stockinette side. Yes, the right side of the side panels is reverse stockinette. Is everyone following along so far? To mattress-stitch the seam, I went in to the gaps between the slipped twisted selvedge stitch and the first column of regular stitches. On the side panel, I picked up two bars (left photo) and on the front panel I picked up two "smiles"(right photo). They're really hard to see. I got out my head lamp from my Mt. Whitney climb a few years back. It really helps.

This reminds me of trying to come up with a citation for something that you just can't find an example of in a style guide, where you have to make an educated guess by merging two examples. You librarians know what I'm talking about.

The result of all this is a chunky seam that really shows. This expressed seaming is used to attach the front and back to the side panels and to sew the sleeves into tubes -- although, curiously, none of the photos of the garment in the pattern show those sleeve seams. More traditional seams are used across the shoulders and for setting in the sleeves.

I stopped by a yarn shop to pick up some sturdy sock yarn to do the seaming, but decided to give this bluish-green color that I had from some past project a try. It doesn't show at all, so I think I'll just stick with it. I can always return the sock yarn later -- I only bought one tiny sock's worth, and I'm not all that fond of the color, despite its greenness.

Back to it!


Saturday, October 05, 2013

Greensleeve

Don't be too quick to cast me off discourteously, but I think I've used this title for a blog post before. As long as I'm knitting green sweaters with green sleeves, however, I reserve the right.

This sleeve took a while, for some reason. I just haven't been able to devote the time to knitting (or blogging about knitting, for that matter) as I'd like. The size I'm making, 42" chest with 2" of ease, calls for increasing every 10 rows 13 times. Pretty easy to count. I had to concentrate during the sleeve cap shaping, but my size is one of the easier ones to follow, so no real worries. It looks kind of stumpy here, but a few inches of ribbing will be added to the cuff edge later.

The bound of stitches on the cap and other parts of the sweater use a sloped bind-off method, where you turn before knitting the last stitch in a row, slip the last stitch worked from the previous row, and then bind off in pattern as usual. I wasn't watching as closely as I might have, and some of these edge stitches got a little stretched before binding off. But I love the effect. It really smooths out that stair-step effect you can get with a normal incremented bind-off. You can see the smooth curviness this technique gives to the cap.

Now, I'm following the deceptively spare and simple instruction' "repeat for second sleeve." After that, it's adding the cuffs and a neck, and then the sewing. Loft, while lovely and hard-wearing, doesn't have the tensile strength for use in sewing seams together. The pattern recommends using a sock yarn in a similar color. I don't know that I have any dark green scraps, so I may be in the weird position of buying sock yarn to finish a sweater...