Saturday, July 25, 2015

We Come 'Round Right

I'm going to be attending a reunion of my grandmother's family, the Weavers & Armstrongs, next weekend. She was one of eleven children, so as you might imagine, it's quite a crowd. My early memories of summer visits to Texas involve this reunion, and being greeted by dozens of people whom I'd never met, but who all seemed to know me and my place in this large group. It's a day for warm memories, great food, bad jokes and just catching up. I love it.

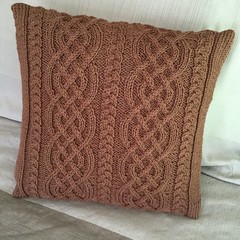
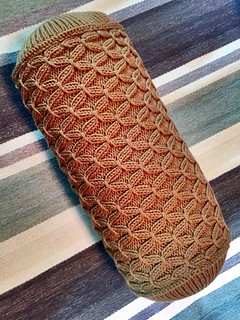
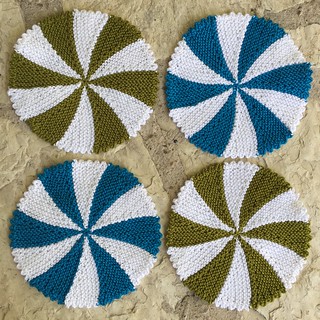
To raise money for renting the space and catering some of the food, relatives bring handmade items to be auctioned off in a silent auction -- or maybe not so silent -- we are talking about Weavers here. Items can run the gamut from preserves and jams, to handmade quilts and wooden toys, My contribution this year is a set, or possibly two sets, of Shaker Dishcloths as designed by Staci Perry at VeryPink. I made some versions of these in placemat and coaster sizes a few summers back.

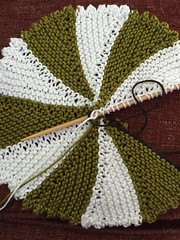
Because I went rogue and chose a different yarn than the pattern called for, I had to make an adjustment. This yarn, Cascade UltraPima, while beautifully shiny, is a bit on the thin side for this project. This picture shows what was going on -- a strange gappiness right before the color change, most noticeable in the white (see photo). I tried going down a few needle sizes, but didn't like that. I settled on wrapping the slipped stitches, like one might do on a short row heel on a sock. Then I tweaked things even more by twisting the wraps just before knitting them together with their accompanying stitches. This added a bit more density to the final row, but I preferred that to the weird laciness I was seeing.

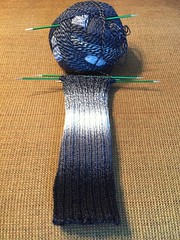
In other projects, I'm working on a pair of ombré socks using the Crazy Zauberball yarn I got in Pennsylvania in May. I love just working the 2x2 ribbing. You can't really get a matched pair with this yarn, but I did at least want to keep the patterning a bit more symmetrical, so I'm going to use afterthought heels in solid black. The toes, too. That way, even though they'll be striped quite differently, they still have the same heels and toes and look a bit more like a pair. That's the plan anyway. We'll see how that pans out.

Sunday, July 19, 2015

The Braid-y Bunch

I finished what I think will be the last installment of my knitted pillow project. If you've been following along at home, I was originally going to make three, but a gauge problem saw me buying an extra (smaller) square pillow form, so I just had to knit another. And the extra pillow ended being the Celtic Knit Aran Pillow, finished this afternoon.

I loosely used a pattern that appeared in Canadian Living that I saw on Ravelry -- with some modifications. The pattern says it makes a 16"x16" pillow. I had a 14"x14" form, so I went down a needle size (US 6, 4mm) and trusted that the worsted Cascade 220 I was using would be a bit thinner than the Aran weight called for in the original. And it worked. The original also called for a split back with buttons But I didn't like how all the examples gapped around the buttons in the back. This can be fixed with a bit of ribbon, but the whole thing was shaping up to be way more fiddley than I was in the mood for. Ain't nobody got time for that. I was mostly interested in the braided Celtic knot motif, anyway.

After getting 14" of the cable pattern finished, I continued knitting plain stockinette for another 14". After blocking (see right), I used an invisible horizontal seam to join the top and bottom. I don't know about you, but mine are always quite visible. Perhaps I tension the yarn too tightly? Then I just seamed up the sides. Just before sewing up the final side, I found a place on the back where I hadn't caught all of the yarn and it looked quite weak. To reinforce things, I darned a bit of yarn across this spot on the inside. That was close. It's a little noticeable when you rub your hands over it, but not too bad.

So what was originally meant to be a series of quick springtime projects dragged quite far into the summer. I'm overall pretty happy with how these turned out, even if I'm not so sure about the colors going together. I've never really trusted my color sense -- and it doesn't help that I'm drawn to grays and browns. But I think they'll do. In any case, Pona seems pleased. I hope he lets me enjoy looking at them for a while before he chews them up. I can almost see the wheels spinning in that tiny little head of his.

Next up -- yet another pair of socks.


Wednesday, July 08, 2015

Buttoned Down

Who's got the button? Me -- and two of the pillows I recently knit.

I'd been fretting about buttons for these pillows, especially the round Spiral Galaxy Pillow, for some time. I looked for a fancy glass button at the Maryland Sheep & Wool Festival this year, but couldn't find anything I liked. As I thought about it, I decided I wanted it too look like those old shiny, silky pillows my grandmother had in her living room, with a button out of the same fabric. Something to draw it all together, but that wouldn't steal the show. For the just-completed Smocked Rib Stitch Pillow, I needed buttons to rein in the end caps, which were being pushed out by the pillow form and were decidedly nipple-ish. Not a good look.

Knitted buttons made from the same yarn as the pillows themselves would be the way to go. So while running errands this morning, I stopped by Bolt Fabrics and got some Dritch cover button kits and heavy upholstery twine. The salesperson was so helpful to walk me though the process. It was pretty obvious I was in over my head.

Based on our conversation, I realized that my knitted covers would be too thick to snap on the backs. Kindly, Jeff sacrificed an old brown t-shirt so the buttons would have a base that wouldn't let the metal shine through. Then, I knit some small covers using matching yarn and constructed as follows:

  • Cast on 4 stitches
  • Purl a row
  • Increase one inside each edge stitch every right-side row until 12 ston needle
  • Make two rows plain
  • Decrease one inside each edge stitch every right-side row until 4 st on needle
  • Bind off

I ran the tails through the inside edge of every other selvedge stitch around the edge and drew the cover in tightly. And, voila -- a knit-covered button!


I found some instructions on sewing buttons on pillows and away I went. Drawing the thick twine through the long pillow was a bit of a chore, and upholsterers would probably have a special tool for such purposes, but I can report that a seaming needle, squishing hard and grunting can work in a pinch.

Way easier than I thought it would be and I'm happy with the results. Now, I have one more naked pillow form to get covered...

Sunday, July 05, 2015

Smock and Awe

A flash of genius and a little help from my friends helped me all but finish my Smocked Rib Stitch Pillow this weekend.

I had some real hiccups with this, mostly because I was making it up as I went along. The crochet provisional cast on worked, but it didn't unzip correctly. Which I should have anticipated if I'd thought a bit harder about it. Flipping the yarn back and forth over the chain to k2p2 meant pulling all the yarn through a loop every other stitch when trying to remove it. What should have taken 3 seconds ended up taking an hour.

Then I tried to focus on seaming the thing together by grafting the 2x2 ribbing. Staci has excellent instructions for doing this, but I just kept messing it up. I have regular stockinette Kitchener grafting so stuck in my head that I couldn't get the rhythm. And the squished together stitches made it hard to see what I was doing. I must have started and stopped four times. I grumbled about this with my knitting crew, and they convinced me that a 3-needle bind-off would work just fine. And they were right. Not totally invisible, but not too jarring. And it's a tube, right? The seam can always be rolled out of view.

The part I was on my own with was the end caps. I wanted round pieces, which aren't the easiest thing to do in knitting. I toyed with the idea of crocheting round pieces, but thought the styles would be too different. So I went with Elizabeth Zimmerman's pi method, wherein the number of stitches is doubled after the number of rows has doubled. I'm sure I learned some theorem or proof about this in Mr. Ashorn's geography class back in high school, but if so I've since forgotten. The basics are:

  • Start with 8 stitches
  • Knit a round (2 rds) then double the no. of stitches (16 st)
  • Knit until 4 rds from previous increase then double the no. (32 st)
  • Knit until 8 rds from previous increase then double the no. (64 st.)
  • Knit until 16 rds from previous increase then double the no. (128 st)

I ended up knitting one more round just to tidy things up. The 128 stitches around the end panel happened to be only four fewer than the 132 stitches on the selvedge edge of the tube -- 11 repeats of the 12-row motif. I didn't plan this -- math, geometry, gauge and tension just worked out in this case. I couldn't have planned it.

Then I needed to figure out how to get this attached. I had live stitches on the end pieces, which needed to be both bound off and attached, so I did what amounted to a combination gusset pickup and bind off. I put the needle through a live stitch on the end panel, grabbed yarn through a selvedge stitch from the tube, pulled it through both, then bound it off on the next stitch. This created a nice exposed crochet chain edge, that was almost one-for-one between the two pieces. Every 32 stitches I skipped one and the count lined up perfectly.

The first panel was easier than the second, because I had to have the pillow form stuffed inside for the latter. And I don't think I'm quite done. The form poofs out a bit on the ends, making the pillow look like one of those canisters you put in the pneumatic tube at a bank drive-through. I'm thinking of pulling them in with some upholstery buttons.

I like how the smocking pattern makes it look like the pillow is covered with dragonflies when viewed at the angle in the first photo above. Very appropriate now that our sultry Texas summers seem to have finally arrived. Hope you're enjoying your summer as much as I am!