
While visiting Gettysburg this past summer, I got to admire all the amazing handspun yarn that she's made over the years. Noting that she couldn't knit it all, she said I could take a batch of whatever I want. Janelle's palette runs decidedly blue/green, so this batch of cranberry red yarn really jumped out! We both knew it wasn't enough to make an adult sweater, but she suggested that maybe I could work in another color in some way to stretch it out. After I got back to Texas I bought some in Brooklyn Tweed Loft in a grayish-brown called Barn Owl, and this is what I came up with.
I'm using the general crew-neck raglan pullover recipe as outlined in Ann Budd's The Knitter's Handy Book of Sweater Patterns. I've had this book for years, and it's a great go-to source for when you want to branch out on your own in knitting a sweater, but still need to fall back on well thought-out formulas for increasing and decreasing and just general fit.
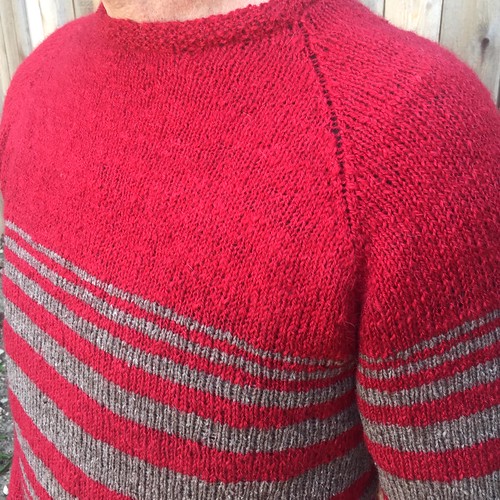
I needed to insert the contrasting color in some sort of interesting way, but wasn't sure how. I knew from other design things I've perused that the Fibonacci sequence often produces eye-pleasing results, so I played around with a spreadsheet, adjusting strips and measuring row-gauge, before coming up with a plan. I skipped the number 1 and came up with alternating rows of red and gray/brown yarn in the following sequence: 2-3-5-8-13-8-5-3-2. That is, after 1/3 of the sweater being knit in red, I started with two rows of brown, two rows of red, three rows of brown, three rows of red, etc. Originally, I thought that the top 1/3 of the sweater would be brown, but I decided I had enough to make the top red, and I think it looks much better that way. I did the sleeves the same way, and they more or less match. I like how from a distance, it looks as if you're looking down on a striped cylinder. It also give a sense of motion if I squint just right.
Although it's made of alpaca and wool, I was surprised how un-hot I was in it in our low-80s temperatures when we went to the back yard to take some pictures. The main problem was all the mosquitoes that have appeared since our copious Harvey-related rain. I can't wait until it cools off a bit so that they all go away, and I get to wear my new sweater.