Saturday, March 30, 2019

Big Needle Therapy

After months of knitting with cotton yarn on 2mm needles, my hands and my brain needed some big needle therapy -- forgiving wool, large gauge, easy-to-see stitches and quick progress. But first, I had to wrap up some loose ends.

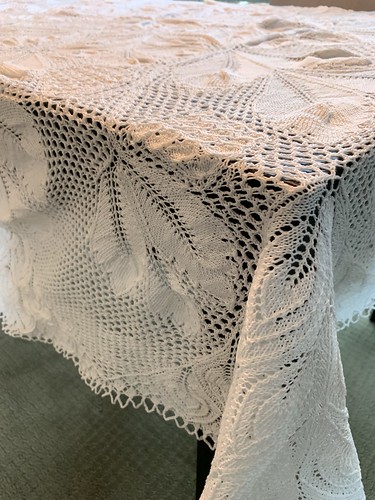
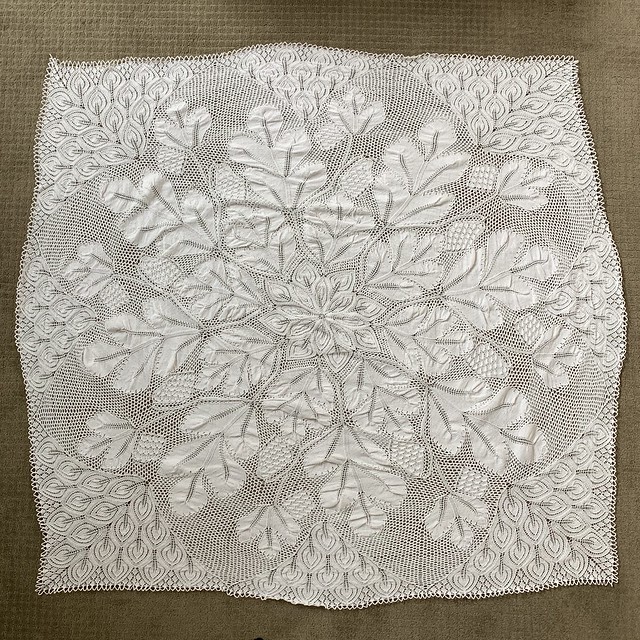
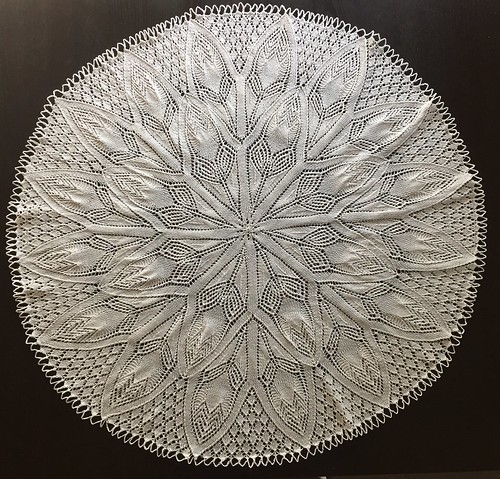
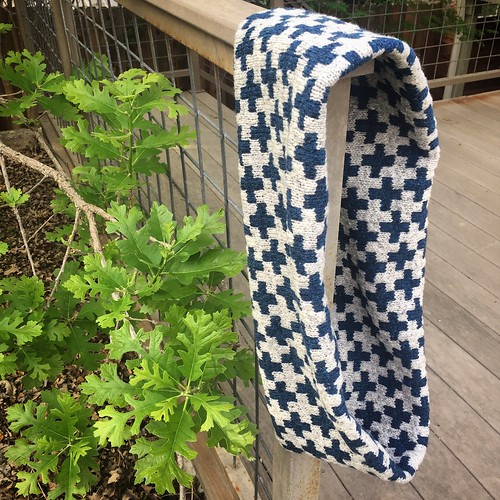
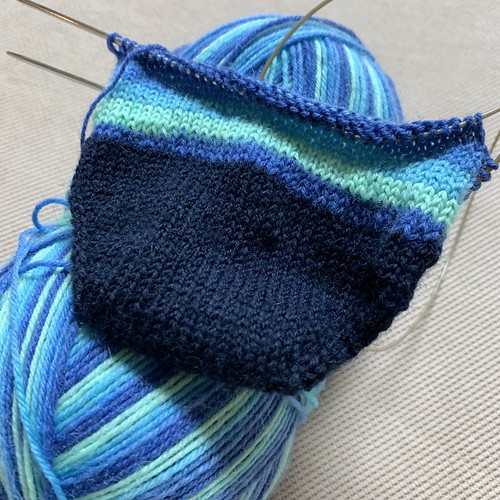
Because the tablecloth was getting bulky and the chances of major knitting disasters at such a late stage in the process were getting higher, I decided to leave it at home when we traveled to Zion National Park at the beginning of the year. I always want to have something to work on for in the air or in the evenings when away from home, so I cast on for a pair of socks using some yarn given to me by my friend Jene at Christmas. Thus, the Fickle Step Socks. They're knit on 2.25 dpns using Quince & Co. Finch sock yarn in a colorway called Honey. Such a great matchup of yarn and pattern. By the time I'd finished the tablecloth, I'd been taking this project around to knitting get-togethers, but hadn't made a whole lot of progress. But as soon as the tablecloth was done I launched right in before the momentum wore off.

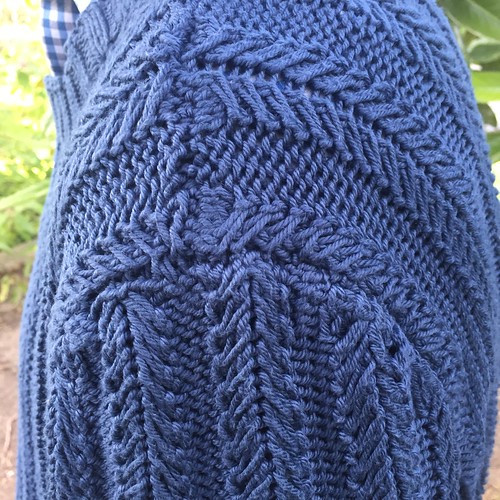
The cables use a double wrap on the row before the stitch crossing, which creates less pull on the lower stitches. At first, I wasn't sure I liked it, but after blocking, the effect is quite nice. I have a tendency to torture cable stitches and this is a handy antidote to that. Not sure if it would be appropriate in all cases, but it worked here. It also made crossing stitches without a cable needle a breeze.

Then it was on to a project and yarn that were both outside my wheelhouse, but just the thing I needed -- the Arrowhead Poncho by Pat Walker using Kraemer Yarns Mauch Chunky in a color called Blueberry Ice, also a gift.

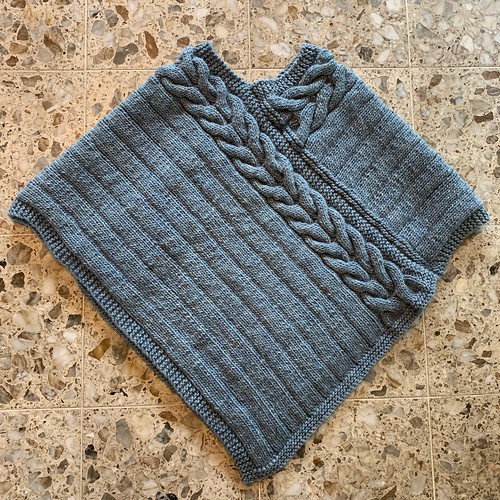
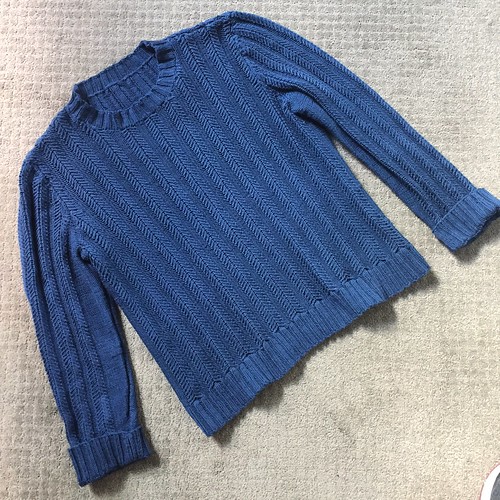
It uses 6.5mm (US10.5) needles. I can't remember the last time I knit something on needles this large. It went by so fast! Thirteen days from cast-on to seaming. The pieces were finished pretty much in the first week, and this week was just blocking and waiting for some time to be able to piece this together.

It's a cool construction -- two long rectangles (mine were 33" x 20") with ribbing across and a couple of squishy cables on one side. Then you sew the two pieces together in a twisted way that creates this natural poncho shape with beautiful cables to frame the wearer's head. On this one, I did use a cable needle. Four-over-Four is a bit much for trying to knit without one. I did attempt it -- once. Then I dug out a cable needle. This thing is warm and heavy. It's not for me, and I'm not sure what I'm going to do with it. I'm leaning toward donating it to a silent auction that my medical librarians' group holds in the fall. We'll see. For now, I'll just admire it.

Already on to more things! I'm working on some self-striping toe-up socks using some yarn I got over the holidays. They're going to have a contrasting toe and heel. And I'm thinking of incorporating German short rows. I've never used them in a pattern before, and I'm looking forward to it. I had a bit of a problem visually while trying to do the increases on the toe with this dark yarn, so I'm anticipating a bit of trouble, but fiddle-dee-dee.

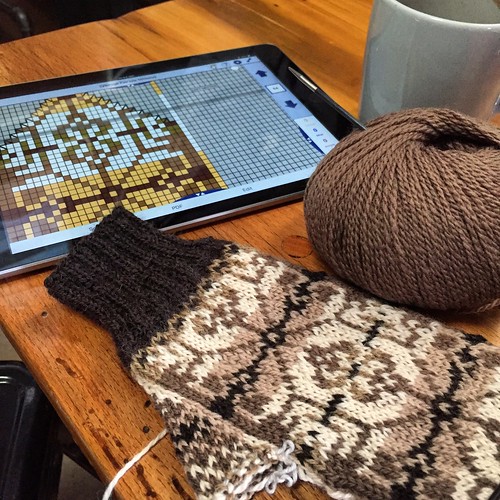
I'm also thinking ahead to sweaters. I'd like to make Ann Budd's Cambridge Jacket because I fancy a zippered cardigan. I like the purl lines that make this interesting -- and will likely help with the fit. It's been a while since I've worked with a zipper so I think I'm up for that challenge.

I also just saw an episode of the current season of Project Runway that had a sweater that really called out to me. It was worn by contestant Sebastian Grey. I kept driving Jeff nuts by pausing the show every time it came on so I could make note of some different aspect of it. I like that it has some fairly muted "me" colors interspersed with stripes in tangerine and lemon yellow, which are so not my thing. But it looks good here.

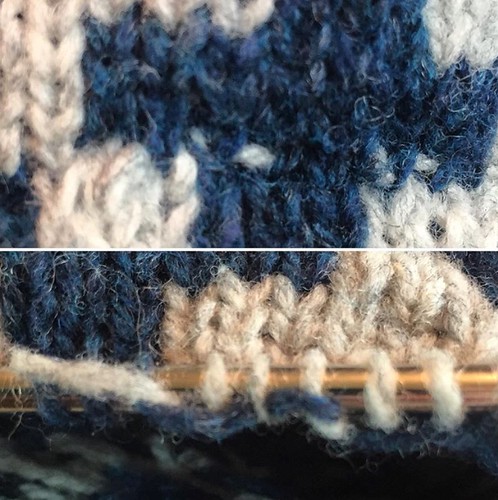
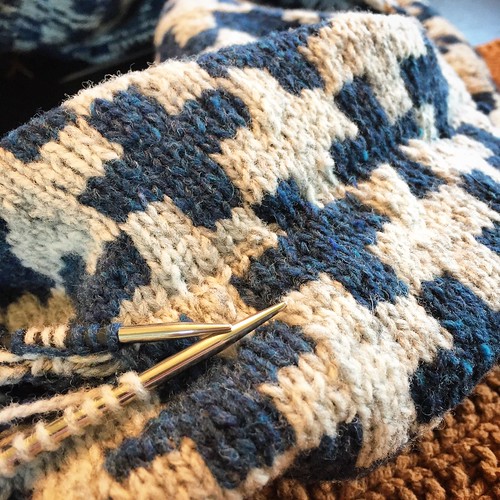
I think I could backwards engineer this. It looks like a set-in sleeve, but I think it might work also as a raglan. All the colors looked heathered up close -- the tan, the dark teal and the charcoal gray. I'm thinking solids might work better, but this doesn't look wrong. Something to think about...

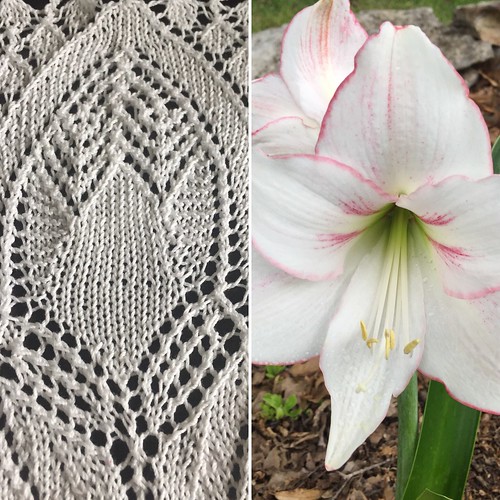
As you can see, getting out from under that tablecloth (literally), has really unleashed my creativity. Hope you're feeling the urge to knit all the things like I am!

Tuesday, March 12, 2019

Three Hundred Ninety-Three Thousand Six Hundred Stitches


How do you measure,
measure half a year?

I finally finished up my Tannenzapfen tablecloth designed by Herbert Niebling this past Sunday. It was technically 393,636 stitches (not counting the crocheted bindoff edging) and took me six months and a day to complete. And there's over three miles of crochet thread in this thing.

I didn't post anything here about progress while I worked on this. When working on a stranded knitting or cables, or even plain stockinette, you can immediately see results and take joy in admiring what you've created so far. There are little milestones that allow you to take stock and reassess. But knitting lace is all about deferred dreams. After the first little bit, it's just a wad of holes sitting in your lap. It's hard to photograph, and nothing looks like it should. When it finally comes off the needles, you can see a bit of the potential, but you just don't have any sense of payoff until the blocking. And six months is a long wait for a payoff.

At first, I thought that the pine cone motifs, the tannenzapfen, would be the most interesting part. They were actually kind of a pain to knit. I ended up using thin crochet hook because I found knitting all those stitches together rather difficult. I do like how they look now, but it turns out I really like the large leaf-shaped portions best. They almost look like solid fabric next to the super-lacy double yarnovers surrounding them. They were the most boring parts to knit, but seem to me to be the most visually interesting in the end.

The instructions I used, a simplified and translated version from Doilyhead, said to simply bind off after the 405th round. But I wanted some sort of edging, so I worked out a system where by 11-stitch crocheted chains ended by gathering up 3 and 5 stitch sections along the edge. I worked a few of these into round 405, didn't like the way they worked with the previous round's yarnovers, and went ahead and added a 406th round of plain knitting. It looked much better. And after knitting 405 rounds, adding another one wasn't all that hard a decision to make.

Blocking this thing is a bit of a bear. It comes from making something knit in the round turn out as a square, which only gets one to square-ish. If you look at the whole thing in eighths, you can see that the corners are where you add some extra stitches. But it still doesn't come out right. There are lumps in the leaf motif that I'm not super happy with. I wonder if ironing the leaves flat would make the tension move out to the double yarnover sections, which, being lacier, might relax and also lie flat?


There, of course, things I wish I'd done differently. I still had some of those plastic-y ring stitch markers which worked great as visual cues for the beginning and ending of repeat sections. However, at this small gauge, the ring was thick enough to create a noticeable gutter through some parts of the fabric, even in the double yarnover sections. I'm saving those for projects on bigger needles only from now on. I also wish I'd stuck with just the jumbo put-ups of Aunt Lydia's Classic 10 crochet thread. Toward the end, I thought I'd just need a regular ball to finish, and ended up needing more. I think I made five Russian joins as I moved from one ball to another during this project. I could have gotten away with just three if I'd planned better.

Immediately after setting this out to block in the afternoon, I picked up the socks I started at Zion National Park. I'd only just gotten past the gusset decreases on the first sock when I sat down. By the time I was ready for bed, the first sock was done. It felt so good to be knitting something else!

Friday, August 17, 2018

In High Cotton

A sweater I'd been working on for a while finally came off the needles this week. It's the Barry Pullover designed by Martin Storey.

I'd been thinking about knitting a cotton sweater for a while. When fellow knitters hear that I live in Texas they often assume I'd avoid knitting with wool and would gravitate toward cotton and other "cooler" fibers for knitting. Cotton is indeed the local Texas fiber and runs through my family background. Both of my grandmothers picked their fair share in their childhoods.

And I do like knitting with wool and and am surprised by how comfortable it can be be in even our mild winters. But I loved and missed the chunky cotton sweaters I'd had back in my 80s college days, including one that was mauled by gibbons (long story).  So I thought something like this pullover might be fun. And although the rigidity of cotton yarn was a bit hard on my hands, it was a cool project.

The pattern suggested two yarns from Rowan, one a cotton-linen blend which was pretty pricey, and the 100% Handknit Cotton that I chose in a color called Thunder. I wanted this sweater to be oversized, so I chose the 48" chest size to give me some ease. I overshot it. This sweater is big on me - one size down would have been more of what I was looking for. I count 22 ball bands sitting on my table, at 50g each, which matches the finally weight of this sweater: 1.05 kg, or 2 lbs, 5oz. It's pretty bulky! It fits well enough with the sleeves rolled up, so I'm pretty happy with it.

The pattern is a cable rather than the slipped stitch I assumed it was at first glance. The paired cable motifs consist of a single stitch that is carried over three adjacent stitches. In order to make this work, and to create the neat herringbone effect, the carried stitch is wrapped twice around the needle on the previous row. This took me a while a to figure out but soon became second nature. When stretched out, there is a visible gap between in the area toward which the two cables lean, but when I'm wearing it it's not really apparent.

There were two other techniques involved in this sweater that were knew to me, both involving the seaming. The side panels were in reverse stockinette. I wanted to use mattress stitch for these, which I'd never done in reverse. It's a matter of picking up "smiles" on one side and corresponding "umbrellas' on the other, which wasn't too tricky, except on the sleeves with all their increases. But unlike stockinette, where I usually pick up a few stitches on each side of the seam, I figured out that for the reverse stockinette bumps to interlock correctly, I had to seam one-to-one.

For setting the sleeves into the armscyes, I used Andrea's instructions for backstitching a sleeve from the Fruity Knitting Podcast. It worked fairly well, although I wasn't exactly consistent between the two sleeves. Since the backstitching is working on the wrong side, I couldn't tell what the visible join was going to look like until I was all done. There are slight variations between the two sleeves, but nothing I'm going to worry myself about. I'm glad I gave it a try.

In a little nod to wool, in the pictures I'm wearing the Harris Tweed cap I bought while in Scotland recently. Interestingly, I saw more weaving-related activities than knitting ones while there. I'll try to write up a post about the fibery aspects of that trip soon.

Here's to cooler weather arriving soon!


Sunday, June 10, 2018

That's a Wrap

I finished up my Orenburg Style Wrap this weekend.

I made this out of Filatura di Crosa Superior laceweight yarn, a blend of cashmere, silk and merino that is a joy to knit with. Tinking back? Not so much. Once it's knit up, it's pretty snaggy and hard to undo. But still, well outside my usual knitting wheelhouse and fun to try. It's so soft. And so light. The finished shawl is about 44" long and 21" wide. The whole thing weighs 43g, or 1.5 oz.

The construction was new to me. It starts with a crochet chain provisional cast-on from which one of the outer edge patterns is then worked, but incorporating short rows so that it comes to a point. This forms one of the corners. I never quite got the stitch count right while doing this for the first corner, although the exact same instructions worked fine on the other three, so the problem was definitely user error. After the first corner is complete, the lower edge is knit and another series of short rows creates the opposite corner. Then stitches are picked up from the edge just created and the whole piece is worked completely side-to-side, with both the interior panel and the other edge strips being made at the same time. On the far edge, short row corners are created similar to the first edge, but instead of picking up stitches, the new edge picks up live stitches from the last row as it's knit. I wasn't really clear what was going on for a while - a diagram would have made this easier for me.

The original pattern says the finished wrap should be roughly 30" x 65". It suggests 3mm needles, but I found that my 3mm needles were too dull for all the K2togs required for this, so I borrowed some sharper needles that only came in 2.5mm. It seems that this .5mm difference translated to quite a bit of a difference in width and length. Mine just drapes over the shoulders -- it doesn't hang down into the crook of an arm. It might work well as a lightweight neck scarf if doubled up.

I'm amazed at how warm this fabric is. For not weighing much, it sure traps in the heat. I had to be careful to keep it to the side rather than in my lap or else it got quite uncomfortable. I'm also impressed with design choices that make this pattern quite accessible. Unlike the Niebling lace patterns I've made, Natalia Shepeleva's design doesn't fuss with the directions that decreases run. That is, you don't have to match a left-leaning decrease with a corresponding right-leaning one. The decreases aren't really part of the design, other than keeping the stitch count balanced with yarnover increases, so it doesn't really matter. And, it's garter stitch lace! That is, it's completely reversible with no "wrong" or "right' side. I had to really concentrate to not purl on what I thought of as the "wrong side" during the first few rows.

Although there is no right or wrong side visually, it helped to think in those terms for the purposes of tracking my way through the charts. For any given row with a side chart, a diamond chart, a center chart, diamond chart again and side chart again, one of the side charts was always one row in front of the others, meaning that the beginning of the "row" wasn't actually at the beginning of the row. Not sure is this is the way it was supposed to be, but it's the way my turned out. As long as I kept track on the charts, I was fine. And after a while I was familiar enough with them that if I got lost, I could find my place again with just a bit of counting.

Up next I'm thinking of making a cotton sweater I've had my eye on. I've got the yarn and I've been swatching. Before I got the pattern, I thought that perhaps it was a slipped-stitch pattern, but now I find it's a cable pattern. So this is going to take a bit longer than I thought. Probably won't get it done in time for an upcoming trip, but I'll try.


Sunday, April 29, 2018

Don't Dawdle, Amaryllis

Unlike Marian Paroo's piano student of the same name in The Music Man, this Herbert Niebling Amaryllis pattern seemed to fly off the needles. One month exactly from cast-on to blocking.

There's just something about the symmetry and pattern of lace knitting that I really enjoy. To start from just 8 stitches in the center, expanding outward in an expanding spiral that gets increasingly slower as you go. By the end, there were 960 stitches on the needle, with each round taking upwards of an hour to complete. And all done with one long piece of cotton thread and just a few a basic stitches. It's all so very satisfying, like putting together an intricate puzzle or constructing a complicated model. I really do like lace knitting more than I ever thought I would. And these Niebling patterns, while intricate and seemingly complicated, are really quite accessible to more knitters than you might think. They're definitely worth a try.

Detail of the pattern alongside my neighbor's Amaryllis
Unlike the two Herbert Neibling patterns I tackled last summer which were roughly oval-shaped (Georg and Flieder), the Amaryllis pattern is round. So there was no picking up of stitches to connect different sections -- just one giant spiral -- which was a lot easier. However, putting in life lines across so many stitches was a bit problematic - but necessary. A few times I found mistakes -- usually right after putting in a lifeline, but in each case I was able to figure out what I'd done wrong, ladder down the stitches, and re-create the pattern correctly. This is so much harder to do in lace than in more traditional stockinette knitting, but do-able if you pay attention to which row you are on. And if you're patient. And if the problems are fairly simple. I found that the surest way to avoid problems was to do a lot of counting as I went -- this left leaning section has 13 stitches on this row, the yarnovers in this direction always take place after 4 plain stitches -- that sort of thing. I have a tendency to do that in my head about all sorts of things anyway, so I kind of find it soothing.

Sample from Amaryllis pattern
This pattern can pretty much be done from the charts -- I didn't have to rely too much on the brief instructions in German that I'd run through Google Translate. There was one section I couldn't quite figure out, which features a small box near a place where the chart seemed to shift over. It looked like it read 5 M. z. , although it was a bit fuzzy. The key in the original pattern reads Maschen zurück d. h. so viel Maschen der folgenden Runde, wie die Ziffer im Zeichen angibt, auf die letzte Nadel der vorigen Runde rechts stricken. Google Translate kicked this back as Mesh back d. H. knit as much stitch as you want on the next round as indicated by the number in the symbol on the last pin of the previous round on the right. Even this didn't quite make sense to me (wish I could figure out what that d. h. abbreviation means - maybe something about the round marker?). I ended up removing the beginning-of-round stitch marker, knitting 5 stitches, replacing the marker and continuing. Seeing that visual 5 stitch difference between rounds 107 and 109 made me think this was the way to go. For the rest of that round, each of the 16 markers (one for each Amaryllis blossom) had to be slid over 5 stitches. It seemed to work. And that strange little 5-stitch section of stockinette has no effect on the entire piece, or course. Not sure if this is what Herbert intended, but it's what happened.


Blocking this thing was a bit of a bear. I used my thinnest blocking wires and ran them around the outside through every other gathering of stitches at the base of each of the 224 edge points. Then I bent them gently into arcs and tried to get a uniform diameter. It ended up varying between 32" and 33" inches across. Sadly, one of the blocking wires bent permanently. But I was able to get it more or less round. Then I needed to pin out the points. I used all of my T-pins and a bunch of yellow-headed pins that I'd gotten at some point. I still had about 50 points to pin. I found a package of safety pins and opened up each of those. Then I grabbed 8 pins from a shirt I'd just bought and unwrapped. Still two short, so I grabbed some cork board push-pins. Whew. It was close. Janelle told me that T-pins make great stocking -stuffers. Just sayin'. While it was damp, I sprayed the whole thing with spray starch (need some more of that, too) and by the next morning it was dry. I love that swishy sound it made when pealing the stiff cloth off the blocking board. Since removing it from the pins and wires, it has tended to gather in a bit and won't lie quite flat. I think it would work better if it were draped over a small table. Still not entirely sure what this tablecloths ultimate fate will be. But so glad I made it.

What's next? More lace, I think. But brightly colored. And much softer... Thanks for stopping by!

Sunday, March 25, 2018

Jujika Cowl

I finally finished the Jujika Cowl yesterday. The major knitting took about three weeks. Then I spent a week and a half just seaming the thing.

This cowl is basically a deflated tire tube, or a flattened donut. Or a torus with no volume inside. You get the idea. It's constructed as a long tube knit in the round. The last round is a seaming round that then joins the last round knit to the first round knit. When everything is done, it should look like a solid piece of fabric. More about that later.

I didn't swatch for this project, figuring it wouldn't really matter being a thing that drapes around a neck. It doesn't really have to "fit" anything, right? About halfway through I regretted that decision. The whole thing was supposed to be about 26 inches long. Mine was 19 inches. I blocked it rather aggressively, not always the wisest thing to do with this rather delicate Brooklyn Tweed Loft, and managed to get it to 24 inches, although it has since shrunk a bit. I'm happy with the density of the fabric and I think larger needles would have made the fabric looser than I wanted. As it is, I can see some of the opposing yarn catches showing through the fabric.

After blocking the un-seamed tube, one is supposed to unzip the provisional crochet cast on and put it on a needle, then graft between the two pieces using a Kitchener-like stitch. It is Kitchener, but you start the 4-step sequence in a different place, and using the color that matches the stitches on the lower needle. Yes - grafting 270 stitches in two different colors. At first it seemed like it was going okay, despite the usual tension issues I have with Kitchener grafting. But then, to my horror, I realized that I had little bars of the opposite color popping up here and there.

It appears that when I knit the very first row of this thing onto the provisional crochet stitches, I had twisted the yarn, probably as a result of trying to catch the opposite color yarn behind. But in doing so, I had caught the opposite yarn within stitches rather than behind them! Can you see the bits of white popping through in the top half of the photo? And the blue strand caught inside the white stitches in the bottom half? Warning to those who try this pattern themselves -- don't bother catching the yarn in the first row. In fact, if your stranded knitting tension is good, you might consider avoiding catching the yarn at all. It's not like anything is going to catch on long floats; they will all be locked away.

What to do? A cast-on row can, in theory, be picked out and re-knit in the opposite direction, but this is really difficult to do (it doesn't just unravel like the last row) and seemed like a lot of work to fix one row. So instead of fixing it, I decided to hide it. I ran a bit of waste yarn through the cast on stitches and tied the ends to together. It's there now, just dangling somewhere within the cowl, unseen. Then, I used a smaller needle (good idea, Staci!) to pick up the right leg of the stitches of the next row down (or up, depending on how your'e looking at it) and re-knit the last row in the opposite direction. This does shift everything over half a stitch, but as it turned out, it's not all that noticeable in such a small stitch pattern. I did have to adjust the beginning step of the grafting instructions to accommodate this, but it all turned out fine. In the picture to the right, you can see the seam line a bit, but I don't think it's too distracting. It's really a clever design - I just wish I'd been able to make it work the way it was supposed to.

There is a small bit of inflexibility along this seam because of the waste yarn behind, although I tried to keep that as loose as possible. And because of my usual tension issues with Kitchener stitch the seam is noticeable in places, but overall I'm pretty happy. I tried it on myself (it's not really me) and it hangs about right when completely open as in this picture. I thought I should be able to double it up and have a tight-fitting neck warmer, and I could, but it wasn't easy and it wasn't pretty. The effect was a bit too Uncle Fester. I may re-block this again just to try and smooth out the seam and try to get a bit of extra length to it.

Glad I made this, though, and I have an idea of someone to give it to. What's up next? Not sure, but I'm thinking of diving back into the world of Herbert Niebling lace patterns...

Sunday, February 25, 2018

Hands and Feet

Since last time I checked in, I made some socks. And more mittens. I'm kind of out of control.

After finishing the pairs of mittens for my sister and sister-in-law, I started looking at all the yarn I had leftover from the kit and thought I really should do something with all of it. The colors I had the most of were all the shades of brown. Perfect! At first I thought I'd make a hat, but wasn't sure I had enough. I knew one thing I had enough yarn for, though -- more mittens.

I searched Ravelry for Fair Isle mitten patterns that used five colors, but didn't really see anything that spoke to me. So I started flipping through my copy of Ann Feitelson's The Art of Fair Isle Knitting for some ideas. There were some mittens featured as a pattern, but they were a bit subdued for the yarn I had on hand. Then, on page 50, I ran across just the thing.

From Feitelson's The Art of Fair Isle Knitting
There in the margin was a pair of vintage mittens that Feitelson uses as an example of common items that Fair Isle knitters might make. Next to the caption "Mittens, the work of today's older hand knitters, (ahem)" was a pair of mittens that really captured my imagination. They appeared to use six colors, but I thought I could adjust. However, now that I was smitten with mittens, I'd have to figure out the pattern myself.

With much squinting at the photo and a bit of guessing, I was able to chart out the pattern by using an Excel grid with different background colors. It was very slow going, but it really helped me figure out the symmetry. While making it, I kept thinking that the person who originally made these likely just had a few common motifs in her head and designed it as she went. I made a chart for the left hand, and then for the right. The original mittens have the thumbs arising from the palm, but I didn't have any idea how to do that having never done it myself, so using the patterns from the kit I'd just used, I charted out a thumb jutting from the side and keeping the pattern from the palm all the way around. Afterwards, I charted out the top of the thumb that is added at the very last after the body is complete. Once I had it done in Excel, I downloaded a PDF copy, and then pulled it into my KnitCompanion app so I could keep track of where I was as I went.

I'm surprised at how smoothly this all went. Luckily, the number of stitches in the mittens in the book matched up with the number in the kit patterns, so I could refer to that when I got in the weeds. I'd originally planned to make a 62-round pattern, but since the last round involved a color change right at the end, I left that last round out and used Kitchener stitch to close the finger tips across the last 20 stitches.

The thumbs were super fiddly and involved multiple yarn color changes across just 19 rounds of knitting. I use the same method used to catch floats in fair isle knitting to introduce new colors and weave out old ones. This adds a bit of time to the knitting, but is so worth it (to me) at the end when I can just turn the whole thing inside out and snip off all the dangly bits without having to worry about them coming undone. This was really hard to do inside the the thumb which was basically a 24-stitch tube. But still worth it.

I'm pleased with the results! I do wish that I'd been left with some more heathered colors to use. I think the overall effect is a bit more graphic than the original. The only heathered color is a goldish one (called Camel Heather) that you can see as the first color past the wrist ribbing. All the rest were solid colors. And they didn't always play nicely. I got several inches into my first mitten when I realized two colors weren't contrasting enough and went back to the drawing board, or rather, the spreadsheet. Jeff likes the tan background color (Almond), but that's the one that bugs me the most. The heathered grayish-blue in the original is so much more, I don't know, subtle and fluid. Still, I think the whole things works. These are too small for my hands, so I'll hold on to them and find someone with daintier hands to give them to.

I also made some socks at some point since the beginning of the year. The yarn was a Secret Santa gift from my friend Abbe and boy, does she know the kinds of things I like. It's Crazy Zauberball yarn in a colorway called Herbstwind (Autumn Wind). I love all the greenish blues and dark reds. Like other Zauberball yarns, these are kind of hard to predict where they'll go with their striping so I chose to use a solid yarn for the toes and a matching afterthought heel to pull it all together. The rest is just 2x2 ribbing across 72 stitches, with solid stockinette across the soles. I'm really happy with them. I finished them about a month ago, and am just now realizing I haven't worn them. That window may have closed, though. I'm afraid our cold weather is mostly gone for the year. They'll be there for me next year, though.

Not entirely sure what's up next. I just got a book from the public library, the Japanese Knitting Stitch Bible by Hitomi Shida. It's absolutely gorgeous and I'm entranced by all the intricate patterns. I'm sure some of these could be used to make some socks, a cowl, a scarf, a hat...