Showing posts with label Fair Isle. Show all posts

Sunday, February 25, 2018

Hands and Feet

Since last time I checked in, I made some socks. And more mittens. I'm kind of out of control.

After finishing the pairs of mittens for my sister and sister-in-law, I started looking at all the yarn I had leftover from the kit and thought I really should do something with all of it. The colors I had the most of were all the shades of brown. Perfect! At first I thought I'd make a hat, but wasn't sure I had enough. I knew one thing I had enough yarn for, though -- more mittens.

I searched Ravelry for Fair Isle mitten patterns that used five colors, but didn't really see anything that spoke to me. So I started flipping through my copy of Ann Feitelson's The Art of Fair Isle Knitting for some ideas. There were some mittens featured as a pattern, but they were a bit subdued for the yarn I had on hand. Then, on page 50, I ran across just the thing.

From Feitelson's The Art of Fair Isle Knitting
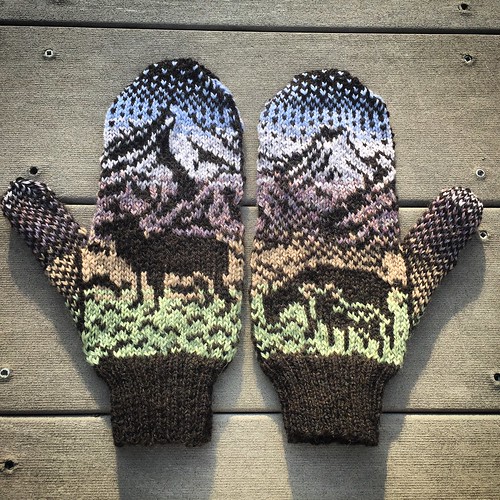
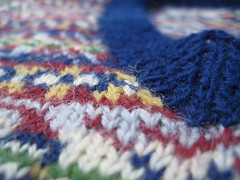
There in the margin was a pair of vintage mittens that Feitelson uses as an example of common items that Fair Isle knitters might make. Next to the caption "Mittens, the work of today's older hand knitters, (ahem)" was a pair of mittens that really captured my imagination. They appeared to use six colors, but I thought I could adjust. However, now that I was smitten with mittens, I'd have to figure out the pattern myself.

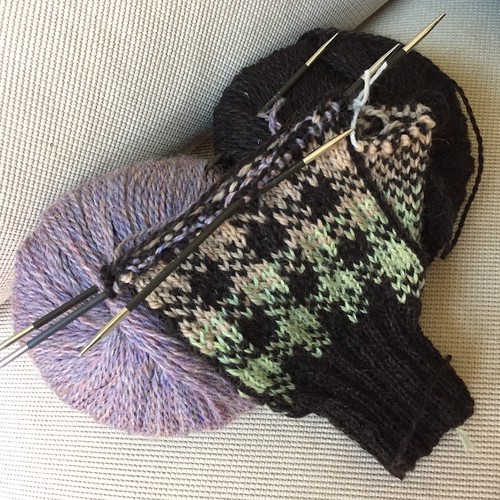
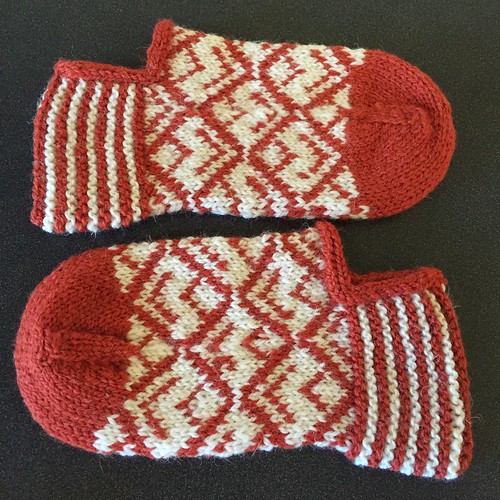
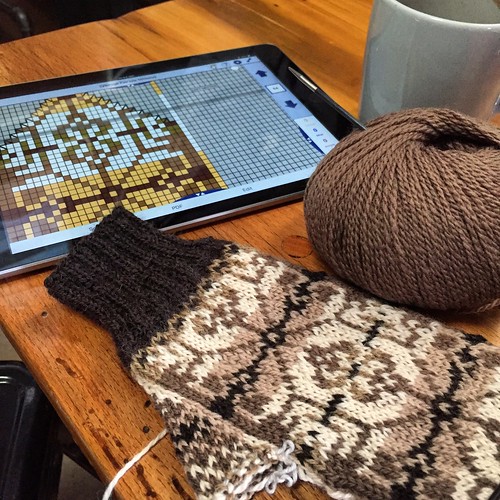
With much squinting at the photo and a bit of guessing, I was able to chart out the pattern by using an Excel grid with different background colors. It was very slow going, but it really helped me figure out the symmetry. While making it, I kept thinking that the person who originally made these likely just had a few common motifs in her head and designed it as she went. I made a chart for the left hand, and then for the right. The original mittens have the thumbs arising from the palm, but I didn't have any idea how to do that having never done it myself, so using the patterns from the kit I'd just used, I charted out a thumb jutting from the side and keeping the pattern from the palm all the way around. Afterwards, I charted out the top of the thumb that is added at the very last after the body is complete. Once I had it done in Excel, I downloaded a PDF copy, and then pulled it into my KnitCompanion app so I could keep track of where I was as I went.

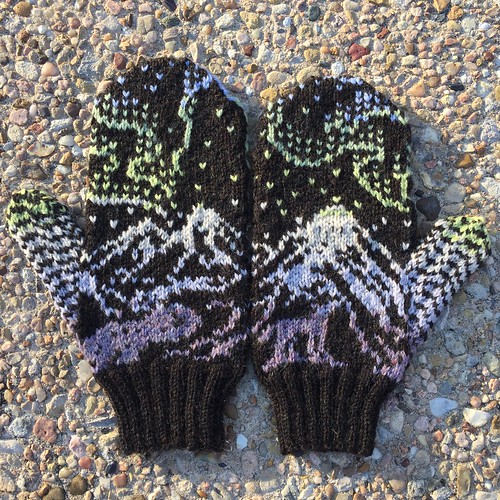
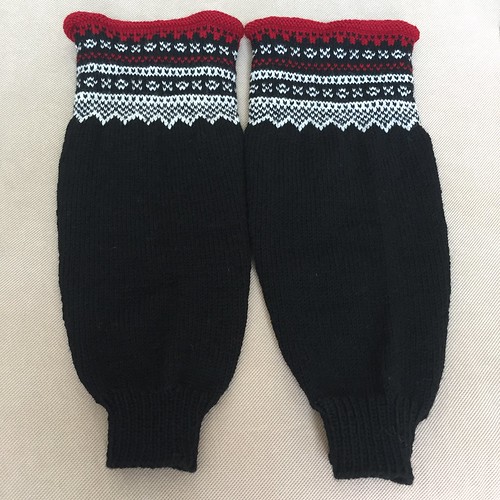
I'm surprised at how smoothly this all went. Luckily, the number of stitches in the mittens in the book matched up with the number in the kit patterns, so I could refer to that when I got in the weeds. I'd originally planned to make a 62-round pattern, but since the last round involved a color change right at the end, I left that last round out and used Kitchener stitch to close the finger tips across the last 20 stitches.

The thumbs were super fiddly and involved multiple yarn color changes across just 19 rounds of knitting. I use the same method used to catch floats in fair isle knitting to introduce new colors and weave out old ones. This adds a bit of time to the knitting, but is so worth it (to me) at the end when I can just turn the whole thing inside out and snip off all the dangly bits without having to worry about them coming undone. This was really hard to do inside the the thumb which was basically a 24-stitch tube. But still worth it.

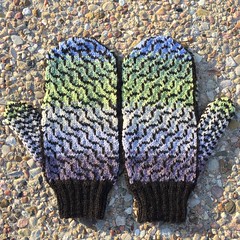
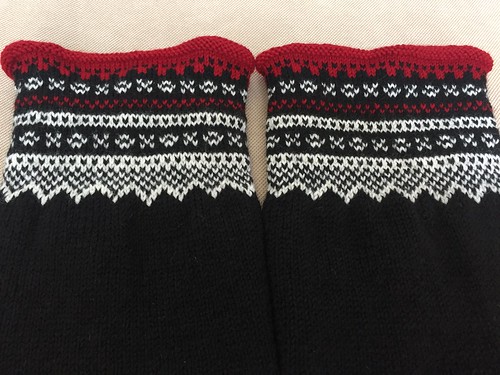
I'm pleased with the results! I do wish that I'd been left with some more heathered colors to use. I think the overall effect is a bit more graphic than the original. The only heathered color is a goldish one (called Camel Heather) that you can see as the first color past the wrist ribbing. All the rest were solid colors. And they didn't always play nicely. I got several inches into my first mitten when I realized two colors weren't contrasting enough and went back to the drawing board, or rather, the spreadsheet. Jeff likes the tan background color (Almond), but that's the one that bugs me the most. The heathered grayish-blue in the original is so much more, I don't know, subtle and fluid. Still, I think the whole things works. These are too small for my hands, so I'll hold on to them and find someone with daintier hands to give them to.

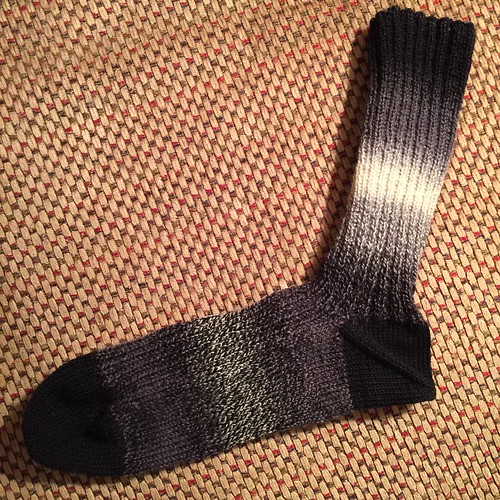
I also made some socks at some point since the beginning of the year. The yarn was a Secret Santa gift from my friend Abbe and boy, does she know the kinds of things I like. It's Crazy Zauberball yarn in a colorway called Herbstwind (Autumn Wind). I love all the greenish blues and dark reds. Like other Zauberball yarns, these are kind of hard to predict where they'll go with their striping so I chose to use a solid yarn for the toes and a matching afterthought heel to pull it all together. The rest is just 2x2 ribbing across 72 stitches, with solid stockinette across the soles. I'm really happy with them. I finished them about a month ago, and am just now realizing I haven't worn them. That window may have closed, though. I'm afraid our cold weather is mostly gone for the year. They'll be there for me next year, though.

Not entirely sure what's up next. I just got a book from the public library, the Japanese Knitting Stitch Bible by Hitomi Shida. It's absolutely gorgeous and I'm entranced by all the intricate patterns. I'm sure some of these could be used to make some socks, a cowl, a scarf, a hat...

Thursday, January 04, 2018

Knittin' Mittens


Over the past month, I made some mittens for my sister and sister-in-law.

I mentioned in my last post that I still had two pairs of mittens to make from the Knit Picks Woodland Winter Mittens kit I'd bought seven years ago. I still hadn't made the November and December patterns, which I thought were the most striking. Perhaps I was saving them for last because they were my favorites? In any case, my plan had always been to make the November pair for my sister and the December pair for my sister-in-law, since their birthdays fall in those months.

The November pair features a scene of deer in the mountain on the back of the hands, and a bold plaid pattern across the palms. It uses five of the Knit Picks Palette colors. I was supposed to use a color called Camel Heather for the light brown section, but accidentally used a color called Almond. Except for losing the heathering effect, I thought it looked fine and decided to stick with it rather than ripping way back. Everything else about it was just fine. From cuff to fingertips, the colors are Bittersweet Heather, Celadon Heather, Almond, Iris Heather, Pennyroyal, Bluebell (I think Knit Picks has renamed that last color Bluebird in the meantime).

This color scheme is called Original and was the only option when I purchased it. Knit Picks also offers this pattern in a much brighter option, bordering on day-glo, called Bright, and a newer color scheme called Stormy that features a lot of dark broody greens and browns. Let's be honest - that's probably what I would have gone with if it had been available back in the day. But I still think the Original color kit shows off the patterns best.

The December mittens are darker, featuring a mountainscape with the Aurora Borealis shining above and a little wolf just above the left-hand cuff. This one uses the dark Bittersweet Heather color as the primary color, and has six, rather than the five contrasting colors of the November mittens. They are, from the cuff up: Iris Heather, Pennyroyal, Oyster Heather, Green Tea Heather, Celadon Heather and Bluebell. I love how the colors sweep up, and how the green of the aurora seems to be reflecting off the top of the mountains. What I've also always loved about these patterns is the way the picture carries across the two mittens. When wearing them, the wearer can't see them because they're on opposite hands. But if the wearer holds them up in front of her face, anyone looking at her can see the complete picture.

As I learned after making the first few pair the thumbs on this pattern, at only 20 stitches in circumference, are rather snug. So I added four stitches at the base of the thumb. This allowed for a bit of extra girth and allowed me to pick up stitches at the problem area where the thumb meets the main body of the mitten, closing up any gaps. The down side is that this broke up the carefully thought-out pattern on the thumbs. This was more of a problem on the December mittens than the November ones, but it's not too jarring, I think.

I gave the November pair to my sister while we were in Colorado recently. I gave my sister-in-law the one finished mitten on her birthday, promising to get the completed pair to her soon. It's going in the mail today! Kind of sorry this kit is finished, but happy that I finally got around to all of them. I hope these keep their hands toasty warm for the rest of the winter and for winters to come.

Next up, a pair of socks, I think...

Sunday, December 10, 2017

Alchemy

Jeff asked me to make him a sweater for an upcoming trip to Colorado with family. I happily obliged, hoping to have it finished by his birthday. I completed it with a week to spare. One month exactly from cast-on to bind-off.

This is the Alchemy Pullover, featured on the cover of Issue 3 of the new Rib Magazine. The designer, Lars Rains, was unfamiliar to me, but he's quite a prolific designer who specializes in working with color and texture in interesting and innovative ways. The sweater is made with 10 colors of Brooklyn Tweed Arbor, which I purchased from Hill Country Weavers. There's a also a 5 color version of the pattern, which I thought was very clever and thoughtful.  It almost tripped me up a few times , though, when I flipped open the magazine to consult the charts and thought I'd made a mistake, only to realize I was looking at the wrong version.

Since I had to check gauge in the round anyway, it made sense to me to just start making a sleeve and count that as my gauge swatch. As luck would have it, I was spot on with the recommended needle size (US7, 4.5mm). So I made both sleeves first, and then started in on the body of the sweater. The sizes made a leap from 42 ¾" to 46 ½" and it called for a few inches of ease. The smaller size would have left only a tiny bit of ease, so I went with the 46 ½" size. It's an inch or two roomier than I might like normally, but better bigger than too snug. Plus, I can wear it also. Just sayin'...

Lots and lots of brown stockinette in the round. I was kind of in heaven. But then the real fun started. Each color in the yoke is used for 8 rounds at a time, with a new color being introduced every four rounds. All but two of the colors are used twice. As an added layer, texture is introduced through purling. I was rather used to knitting with two colors, one in each hand, but I was quite unused to purling with my right hand. I found it quite difficult and now understand while some new right-handed throwers are averse to purling. All that moving the yarn back and forth! So much easier in the left hand. As with any stranded pattern knitted in the round, there is a visible line where the pattern rounds change. You can see this over Jeff's left shoulder in the picture above. I think it's only really noticeable at the top with the yellow and brown.

The one part that that I'm not entirely satisfied with is the collar. It's just more simple stockinette in the round in brown above the yoke, but then goes into a 2x2 ribbing for 15 rounds, finished with Jeny's Surprisingly Stretchy Bind-off. But something about the decrease rate, or maybe just shoulder and neck anatomy in general, makes the fabric gather and bunch up a bit. I've seen this happen in other yoked sweater patterns, but not sure why. So it looks a bit "roomy" in the neck area. I'm thinking, though, that this might not be a bad thing, giving a bit of comfort around the neck, but also trapping warm air in cold weather. I'll go with that.

Speaking of weather, you may notice traces of snow in these pictures. I took these in the morning after a freak late-autumn snow flurry the night before that hit central and south Texas. So unusual at any time, but especially this early in the chilly season. The college where we work had a delayed opening, which allowed us to get this pictures taken. I'm hoping we see a bit more snow than this when we head to Colorado in a few weeks. I know this will keep him snuggly and warm. I'm so pleased he likes it. Happy birthday, Jeff!

Next up, I'm going to finish the last two pairs of the Woodland Winter Mittens kit I got from Knit Picks in 2011. The kit came with enough yarn and six patterns to make pairs of mittens representing the six colder months. Texans - use your imaginations! Within a year of getting the kit, I'd made the mittens for October, January, February and March, but had never made the ones for November and December. I'm not sure why - I'd just set the box aside. From time to time I would unearth the yarn and pattern and remember I needed to get back to them. Now seems to be the time. I've gotten started on the November pair, which features mountains and a large ungulate (elk? moose?) on the back of the hands and a pretty plaid pattern on the palms. They might make nice gifts for people I know who were born in these months...


Tuesday, May 02, 2017

Multifarious Marius Precariousness


It ended up being way more complicated than it needed to be, but at last my Marius Sweater is finished.

When I last checked in, I had realized that my gauge had changed once I started in on the patterned portion of the body of the sweater and had ripped that section out and started again on larger needles. This absolutely did the trick. But then, after re-knitting about 2/3 of the black-and-white portion, I realized that my yarn dominance was off.  This means I was carrying the wrong color in the wrong hand. Ultimately, this doesn't really matter, as long as one is consistent with which color is carried in which hand. But I really wanted he white color to pop, and I had my yarn configured so that the black yarn was dominant.

In the picture to the right you can really see what's going on in the striped steeks. At the top, I carried the black yarn in my left hand. At the bottom, I'd re-knit the same section with the white yarn in my left hand. When knitting with two yarns, the one in the left hand tends to stick out, for most knitters anyway. Usually, I consult my copy of Ann Feitelson's The Art of Fair Isle Knitting before starting stranded colorwork to make sure I get this right, but this time I was just sure that the dominant yarn is carried in the right hand. Oops. Wrong. So, I ripped back yet again.

The third time was the charm -- gauge and dominance were just fine. But I'd already knit the sleeves. With the wrong gauge and the wrong dominance. So I re-knit those, too. It really didn't take that long. The pattern in the sleeves is simpler, without the complex X motif of the body. When finished, I crocheted the steeks, cut the armholes open, and sewed on the sleeves. They fit really well, to my surprise -- I saw a lot of examples online that looked bunched up. And then I tried it on.

The sleeves were too short. About 6cm (2.5") too short. You can't unravel a cast-on edge. Well you can, but you'd go insane. So I picked up stitches just below (or above) the cuffs, snipped off the cuffs, added 6cm of stockinette and then re-knit the cuffs. And THEN I was done.

This really is a cool pattern, and not as complicated as I've made it out to be. I just got so excited to get started that I forgot a lot of the details that would have made this go smoother. If I'd been more thoughtful about gauge and yarn dominance, I would have had this finished in half the time. Fortunately, I'm a total process knitter, so getting it right doesn't bother me. And it wasn't like I was on a deadline -- I only had to have it finished by December, when I'm going with my family for a big ski vacation. Even if I just sit around and sip hot adult beverages the whole time, it will have been totally worth it.

Winter is coming!


Friday, April 07, 2017

De-Tension Slip


Now you see it, now you don't. Generous readers will assume that the bottom picture is the "before" picture and the top picture the "after." That's really sweet of you, but you're wrong.

I'd noticed in the sleeves that the tension tightened up a bit once I started the colorwork. This is normal and par for the course with multicolor stranded knitting. Yarn is carried behind the work and isn't interlaced with nearby stitches. This lessens the stretchy property of a knit fabric, which by it's nature should be flexible in all directions. You can see how it pulled in once the white yarn starts n the photo bellow. But I still thought it looked acceptable and likely fixable with a bit of blocking.

Then, while knitting a few nights ago, I noticed that the body of the sweater was pulling in, too. A lot. I noticed this when I was less than 10 rounds from finishing the body. So I stopped to think. And think. Here's what I concluded:

  • Blocking wasn't going to fix this problem. I'd have to be pretty aggressive about it, and the pattern would be too stretched
  • The fabric was too dense, with little drape to it. I didn't want to it to feel like I was wearing cardboard
  • If I just forged ahead and cut the steeks, I'd have a bunch of pieces of cut yarn and re-knitting would be a splicing nightmare

So, I unraveled it back to the start of the colorwork. Sigh.

Here's what happened. The pattern called for knitting a gauge swatch, but didn't specify to knit it using the pattern. I suppose any experienced Norwegian knitter would know to do this. I would know to do this, too, if I were knitting a garment that was all stranded. But if not given instructions as to how to swatch, I usually just do the first thing that happens in the garment, which is a big old field of black stitches. I'd had to go down a size, in fact, to get gauge. So now, I'm going to go back up a needle size to get a bit more room at the top.

There's no teacher like experience. But I'm not discouraged. Process knitters knit. It's what we do. I'm kind of excited, actually, to get another crack at this beautiful pattern. Back to it! And while I'm at it, I just might revisit those sleeves, too...

Sunday, March 26, 2017

Sleeves Achieved


I finally got the red yarn I needed for my Marius Sweater sleeves in the mail on Friday and quickly went to work finishing up the sleeves.

I'd wanted to get the sleeves completed first to make sure that I was making the armhole steeks the correct height for the sleeves. Several pictures I'd seen of knitters who have attempted this pattern show that the armholes are bit smaller than the sleeves, resulting in some bunching when they are sewn in. I'm thinking that if I know exactly how side the sleeve openings are, I can try and make my steek for the armholes match. That's the plan, anyway.

I'm pleased with how the stranded knitting portion looks. I was a little worried that the white/black combination might be too stark, but like most stranded knitting, it looks a bit better from afar. The fabric does pull in a bit where the white yarn starts, but that's too be expected. I haven't blocked this yet, so I'll be able to add a bit of stretch. I'll need to do that anyway before I measure for the armhole steeks.

I switched from the grayish green Petroleum color for the highlights, collars and seams to the more traditional red, and I think it was the right decision. The grey was kind of sickly looking and just didn't add enough contrast. The red, which is the traditional color for this part of a Marius sweater, is perfect. I was a little worried that it wouldn't pop against the black enough, but it does just fine. If it looks like the sleeves are a bit short, that's okay. This is a drop-sleeve construction, so the sleeve seems are supposed to fall a few inches down from the natural drop in a person's shoulder. I normally don't like this kind of sweater -- I prefer set-in sleeves -- but it's kind of what you have to put up with for stranded knitting. It's possible to do a capped sleeve in fair isle, but way more complicated. And this, ultimately isn't that complicated a garment.

A testament to this is the two pages of instructions. They seem a bit sparse to me, with no schematics of how the pieces fit together. Translated from Norwegian and written in the mid-20th century, I think the designer made certain assumptions about the person reading this person -- their skill, competence, and knowledge of knitting in general. I've been able to follow pretty well, except for a strange few missing stitches toward the top of the pattern charts. Usually, this denotes that some sort of decrease has taken place, although there is nothing in the written instructions that would indicate I'm supposed to do that. After consulting with experts, I came to the conclusion that this indicated a re-set point. All the stitches are supposed to work right and left from a mid-point on the outer edge of the sleeve. You count out from that point to find out where on the chart you start and stop, depending on the size you're knitting. For most of the chart, that's based on a 10-stitch repeat, but for the last few rounds, it shifts to a 4-stitch repeat. So I just reset from that point to figure out a new starting point that resulted in the pattern matching across the whole grid. This is a bit difficult to discuss without showing the pattern, but I didn't want to do that. Trust me when I say that this took up a LOT of time trying to figure out, and that whether I'm right or wrong, I'm satisfied with the explanation I've told myself. At this point, please, don't correct me if I'm wrong! The reverse stockinette at the top is mean to be hidden when the sleeves are attached.

So now it's just back to the body of the sweater and inches and inches and rounds and rounds of knitting with black yarn on black needles connected with a black cord. I'm sitting under very good light, but it can be a bit of a challenge. I'm eagerly looking forward to the stranded portion at the top of the body of the sweater, which is similar to, but much more elaborate than those on the sleeves.

As I've tried to find out more about this pattern, I'm stunned at how ubiquitous it is and almost universally recognized in Norway.  So many cool things out there. I know things are warming up around here, but next time you have a cool snap, keep your eyes open!


Saturday, November 28, 2015

No Mean Feets

The past few weeks have left me little time for the needles, but I have managed to get a few things completed.

First of all, are these stranded slippers, called baffies in Scottish parlance. They're the first pattern in the Seven Skeins club I subscribed to recently. I was going to postpone making these until later in the new year, but I wanted to make something handknit for a friend of mine with a November birthday and I thought these would be just the thing. I hope you like them, Mary Peace!

They're pretty easy to make. Although you can see I had some tension issues, they're really not as different in size as they appear in this photo. They're made toe-up until the garter stitch striped heel. That's worked flat and then joined with a three-needle bind-off. Then it's finished off with an applied I-cord edging. A smart design, really. The white color is called Ptarmigan and the other is called Highland Coo after the shaggy cows of The Highlands. But everyone in Austin thinks it's UT Burnt Orange. I have to admit it's pretty close!

I've also finally gotten around to completing the first of my Domino socks using the ombré-spun Crazy Zauberball yarn I got in Maryland. The rainy, gloomy weather in north Texas this long holiday weekend has given me plenty of time to catch up with this project. It's been on the needles for months. I usually pick it up when something else gets too big or complicated to be easily portable, so I hadn't been working on it with any regularity. The black toes and afterthought heel are a bamboo/wool/silk combination called Panda Silk. This yarn would look better on 2mm needles instead of the 2.25mm that the rest of the sock is knit with, but it'll do. I turned once again to Janelle's excellent instructions for an afterthought heel. So helpful! One more sock to go...

I'm getting pulled in a lot of directions inspiration-wise. I've got my eye on a pullover pattern, I need to make a hat for a friend, I'm kicking around blanket ideas, and I've been wanting to try my hand at a houndstooth double-knit scarf. There's never not something to knit!

Wednesday, October 22, 2014

October Surprise!

My Machrihanish vest is finished! And it seems that it's going to stay together, despite my steeking mishap.

I've thought some more about it, and I do think that I made the crochet chains correctly and in the right locations, but made a poor choice in the yarn for the chains. The instructions called for sock yarn and the nearest at hand was some slightly slick superwash leftover from some previous project. I think its slipperiness along with my loose chaining was the problem. I would recommend using one of the less-used colors from your own vest, like the green in mine, so that the natural grabiness of the Shetland wool works in your favor. If you're nervous, you might consider making the neck hole steek seven stitches wide like the armhole steeks are constructed, rather than the called for five. A bit bulkier, perhaps, but worth it for the peace of mind? Think about it. The thread I used to sew up my disaster is just barely visible in the decrease columns next to the ribbing if you look at a larger version of the photo above. But seeing it while I'm wearing it requires a certain intimacy preserved for few.

The instructions called for steam blocking, but I usually opt for an old fashioned full immersion altar call dunking. My gauge often ends up on the snug side and I need the stretching power of a complete soaking. But as soon as I popped this in the sink, the water starting turning blue and I worried that it would dull the other colors. So I took it right out. Still, it got wet enough for serious shaping. With hindsight, I realize I should have followed those particular instructions. As it turned out, I didn't have to do too much stretching to get this the right size.

Most of the dimensions were right on. I had to stretch out an extra inch or so of ease from side to side. The length came out a half inch longer, but I have a longish torso, so that worked in my favor. The armholes, however, sit a little high on the garment and are the slightest bit snug. It may just seem that way because the shirt I was wearing under it is a bit big on me, but I would like just a bit more room. Some careful additional blocking might work for that, but I don't want to put any more stress on the cut openings than absolutely necessary.

I finished this Sunday evening, but wasn't able to take pictures until tonight. As it was, I had to race home on my bike to catch the last bit of usable sunlight. Having really pushed it on the way home, I was a hot, panting, sweaty mess when I came through the door. Jeff was so patient to put up with my "art direction" (read: persnickityness) and did a pretty good job with the short amount of time we had in the rapidly dwindling autumn light. It couldn't have been fun putting up with me sweating in our mosquito-filled backyard wearing a sweater-vest in 80-degree weather. I hope I was patient enough. I look at this picture of myself and wonder...

All in all, this was a great project. I really love the balance of colors, and it has a wonderful symmetry to it in the size I knit. The solid arm and neck edging pull it all together nicely. I can't get over how different it looks close up versus far away. And as I've mentioned before, the crayon-like primary colors created wonderful patterns that meld together beautifully. Thanks, Katie Davies, for designing such a beautiful garment! More pictures are available over at my Flickr site.

I have yarn left over, more than I predicted. Maybe enough to make a hat? Not one to wear with this particular vest. That would be too matchy-matchy even for me. But Tony pointed out this nice hat pattern called Shwook, one of the examples of which appears to be made out of leftover Jamieson & Smith Shetland Heritage yarn. I'm really liking it.