Unlike Marian Paroo's piano student of the same name in
The Music Man, this Herbert Niebling
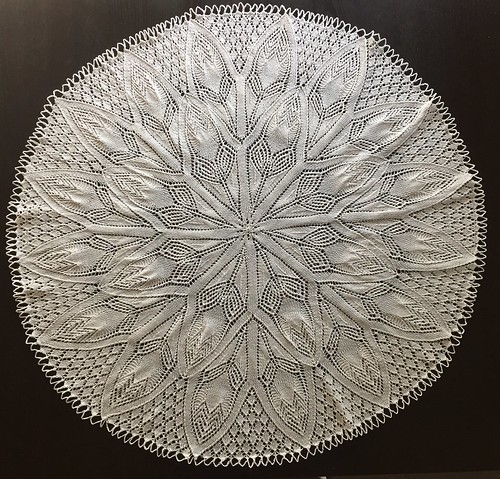
Amaryllis pattern seemed to fly off the needles. One month exactly from cast-on to blocking.
There's just something about the symmetry and pattern of lace knitting that I really enjoy. To start from just 8 stitches in the center, expanding outward in an expanding spiral that gets increasingly slower as you go. By the end, there were 960 stitches on the needle, with each round taking upwards of an hour to complete. And all done with one long piece of cotton thread and just a few a basic stitches. It's all so very satisfying, like putting together an intricate puzzle or constructing a complicated model. I really do like lace knitting more than I ever thought I would. And these Niebling patterns, while intricate and seemingly complicated, are really quite accessible to more knitters than you might think. They're definitely worth a try.
 |
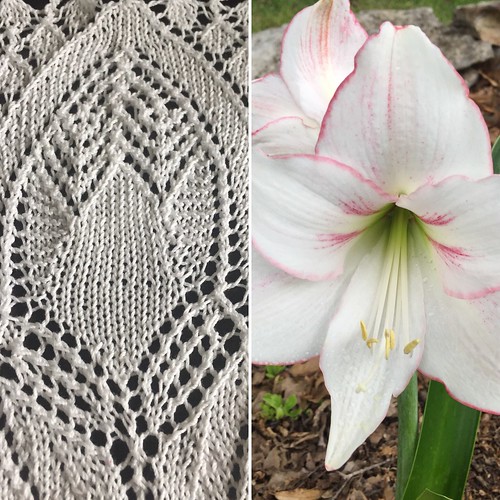
| Detail of the pattern alongside my neighbor's Amaryllis |
Unlike the two Herbert Neibling patterns I tackled last summer which were roughly oval-shaped (
Georg and
Flieder), the Amaryllis pattern is round. So there was no picking up of stitches to connect different sections -- just one giant spiral -- which was a lot easier. However, putting in life lines across so many stitches was a bit problematic - but necessary. A few times I found mistakes -- usually right after putting in a lifeline, but in each case I was able to figure out what I'd done wrong, ladder down the stitches, and re-create the pattern correctly. This is so much harder to do in lace than in more traditional stockinette knitting, but do-able if you pay attention to which row you are on. And if you're patient. And if the problems are fairly simple. I found that the surest way to avoid problems was to do a lot of counting as I went -- this left leaning section has 13 stitches on this row, the yarnovers in this direction always take place after 4 plain stitches -- that sort of thing. I have a tendency to do that in my head about all sorts of things anyway, so I kind of find it soothing.
 |
| Sample from Amaryllis pattern |
This pattern can pretty much be done from the charts -- I didn't have to rely too much on the brief instructions in German that I'd run through Google Translate. There was one section I couldn't quite figure out, which features a small box near a place where the chart seemed to shift over. It looked like it read
5 M. z. , although it was a bit fuzzy. The key in the original pattern reads
Maschen zurück d. h. so viel Maschen der folgenden Runde, wie die Ziffer im Zeichen angibt, auf die letzte Nadel der vorigen Runde rechts stricken. Google Translate kicked this back as
Mesh back d. H. knit as much stitch as you want on the next round as indicated by the number in the symbol on the last pin of the previous round on the right. Even this didn't quite make sense to me (wish I could figure out what that d. h. abbreviation means - maybe something about the round marker?). I ended up removing the beginning-of-round stitch marker, knitting 5 stitches, replacing the marker and continuing. Seeing that visual 5 stitch difference between rounds 107 and 109 made me think this was the way to go. For the rest of that round, each of the 16 markers (one for each Amaryllis blossom) had to be slid over 5 stitches. It seemed to work. And that strange little 5-stitch section of stockinette has no effect on the entire piece, or course. Not sure if this is what Herbert intended, but it's what happened.

Blocking this thing was a bit of a bear. I used my thinnest blocking wires and ran them around the outside through every other gathering of stitches at the base of each of the 224 edge points. Then I bent them gently into arcs and tried to get a uniform diameter. It ended up varying between 32" and 33" inches across. Sadly, one of the blocking wires bent permanently. But I was able to get it more or less round. Then I needed to pin out the points. I used all of my T-pins and a bunch of yellow-headed pins that I'd gotten at some point. I still had about 50 points to pin. I found a package of safety pins and opened up each of those. Then I grabbed 8 pins from a shirt I'd just bought and unwrapped. Still two short, so I grabbed some cork board push-pins. Whew. It was close. Janelle told me that T-pins make great stocking -stuffers. Just sayin'. While it was damp, I sprayed the whole thing with spray starch (need some more of that, too) and by the next morning it was dry. I love that swishy sound it made when pealing the stiff cloth off the blocking board. Since removing it from the pins and wires, it has tended to gather in a bit and won't lie quite flat. I think it would work better if it were draped over a small table. Still not entirely sure what this tablecloths ultimate fate will be. But so glad I made it.
What's next? More lace, I think. But brightly colored. And much softer... Thanks for stopping by!


