Sunday, November 30, 2014
8 Days In
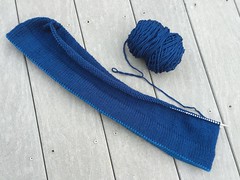
I finished the body of the sweater up to 18 inches. I originally knitted up to 18.5 inches based on my memory of reading the notes from Jeff's version a few weeks ago, but realized I had remembered it wrong. This meant I had to rip back four rounds and try to get 200 stitches back on the needles. Not the most fun way to spend an hour, but it worked. I'm so glad I made those notes in Ravelry years ago. They've really come in handy.
I felt like I needed to get a lot done this holiday weekend while I could. Next week, the Capital City Men's Chorus will be having extra rehearsals for our upcoming holiday concert, and I won't be getting a lot done knitting-wise. Still, it looks like I'm on track for getting this finished before we leave for Germany in a few weeks.
The sleeves knit up much more rapidly than the body of the sweater. I finished the first one at 19.5 inches and the second sleeve is about a third of the way complete. To make the inner color of the cuff work I cast on four more stitches than were necessary, decreased down to where the actual end of the cuff starts, switched to the darker color and then increased on the way up. On the 13th row I caught the cast-on edge on the back to create the hem. The edges are a bit bulky but I think they will be a little less rounded once I have a chance to steam block. Right now, they look kind of spring-loaded.
I'm not sure what kind of collar to make. For Jeff's, I did a 1x1 ribbed collar twice as long as needed and then sewed it back under. But this is a little small for my big head. I still have some time to think through options. Not a lot, but some.
A note on color: my phone seems to push this color of blue more toward violet than it really is. It's more of a softer midnight blue in person. Which is a little more me.
[After crashing one post, I hastily composed this post using the voice recognition function on my tablet. Upon re-reading, I was horrified at the weirdness wrought by auto-correct. If you read this earlier, please give it another go.]
Sunday, November 23, 2014
Chattily Written
I always liked the Elizabeth Zimmerman pattern for the Seamless Hybrid Sweater from her book Knitting Without Tears. I made one for Jeff years ago. He doesn't wear it much, and these days it's a bit large on both of us. I still might take it, but I still want one of my own. So yesterday, I went to the yarn shop and got some skeins of that great workhorse of a yarn, Cascade 220. I bought the colors based on what I liked, but they were only numbered. At checkout, I found the colors were called Atlantic and Marine -- perfect for a trip across the ocean, even if it's on a plane.
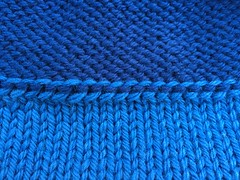
Atlantic is the darker blue main color. Marine is a lighter blue that's going to serve as a peek-a-boo contrast for the insides of the hem, cuffs and collar. I started the hem with Marine, using the German twisted cast-on. I worked 12 rounds, switched to Atlantic and worked 12 more rounds, then knit the next row together with the cast-on after folding it under. It's exactly the effect I wanted. The Marine just barely peaks out, and the edge doesn't curl. Plus, it's a different hem look from the usual ribbing. This detail picture shows the hem from the back.
I've mentioned this before, but I really enjoy Elizabeth Zimmerman's patterns. They're the knitting equivalent of story problems in mathematics. There are rules and proportions you have to figure out, mixed with commands one would be wise not to ignore. All interspersed with her razor-sharp wit. As she herself says, the instructions are rather "chattily written." Let's just hope I can keep up with the conversation and get this cranked out in the next three weeks.
Sunday, November 16, 2014
Footy
Lots of knitting wrapped up this week, having to do with feet and foot-intensive sports.
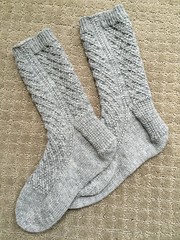
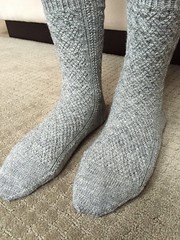
First, I finished the Inlay Socks I'd been working on in fits and starts since this summer. I used some yarn I bought at a shop in Idar-Oberstein, Germany last winter while visiting my brother and his family. This pattern features diagonal traveling twisted stitches that give the illusion of weaving. And best of all, the cabling aspect is done without a cable needle or dropping stitches precariously off the main needles. Very fiddly and a bit difficult to get used to. I never could memorize the flow of it, but I still enjoyed the process.
These are a bit snug on me, but I imagine that's due to the lack of ribbing. They're 76 stitches in circumference, which is a tad bigger than I usually make, but the traveling of the stitches pulls the fabric in and makes it a bit inflexible. I made the largest size, but if you ever make these, consider looking at the next size up. Can't wait to wear them this week. The weather has turned chilly, making for some brisk mornings on my bicycle. My hands and face have been frozen, but my toes have been warm in my handknit socks, though now I'm faced with a pile I need to wash today.
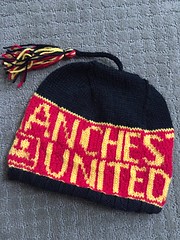
We'll be going to Germany again this Christmas, and this time I'm planning on taking some handknits for our niece and nephew. They're quite the English Premier League fans, and their parents are treating them to see a Boxing Day match in Manchester, featuring their favorite team, Manchester United. I found a pattern in Ravelry that I thought might be a nice little something to keep,their heads warm during the match -- the ManU Hat.
I ordered the yarn, Knit Picks Brava Sport, a few weeks ago. It got here Wednesday and I immediately cast on. It's tougher than it looks. First of all, knitting with acrylic is always a challenge, but I wanted this to be durable. And there are some awfully long floats in the red and yellow sections, necessitating catching the unused color behind the work every few stitches. It pulled in a few places, but I think it mostly worked.
I made a few modifications. There were supposed to be additional Red Devils and a soccer ball motif in the black section up top. I couldn't get the floats to work around the corners without pulling. So I left them out with the idea of duplicate stitching them on later. But when I was done, I decided I like it better plain. And I added a tassel using all the colors and attached it with some i-cord. Overall, I think it looks pretty sharp, although I won't know until I see it on some little noggins.
Now -- to make another one. I'm playing with the idea of reversing the red and yellow in the pattern, but haven't decided for sure.
Sunday, November 09, 2014
Border Security
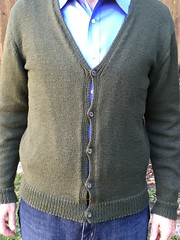
I've never been happy with the button band on the Fine-Knit Cardigan I made last summer and this weekend I decided to do something about it.
I'd known all along from the sample pictures in the pattern book that this button band would be a bit gappy. In the original bamboo yarn it was even more of a problem. The fact that the band is ribbed only exaggerates the gaps. As you can see here, the effect isn't very attractive. I'd gotten to where I wasn't even bothering to button it while wearing it at work.
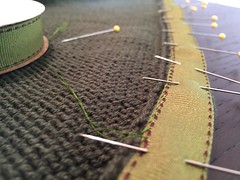
So I did a little research and consulted with my friend Abbe Saturday morning about some options. I ran by the fabric store and got some matching 5/8" grosgrain ribbon to back the band. After watching several YouTube videos on the technique, I sat down to work.
What I don't know about sewing. Geez. I decided to just run the ribbon continuously up the button band, around the inside of the neck, and then back down the placket. I pinned it flat and whipstitched (new skill for me!) it all the way around. It went more smoothly than I expected, although rather slowly. Today, when I finished, I had to figure out getting buttonholes cut into the ribbon. Ideally, I should have put the holes in with a button hole attachment on a machine before attaching it. Yeah, I know. Seems obvious now. Grosgrain frays terribly when cut, so I thought I should try to sew button hole stitch around the openings by hand. After several hours of practicing I realized this wouldn't be happening anytime soon. I had just about given up ever buttoning this sweater again, when I ran across another frustrated crafters solution.
Super Glue. Don't judge me. It worked. I just dabbed a bit on the back of the ribbon opposite the buttonholes, then carefully cut slits through the glued parts. No fraying. It's not beautiful on the backside, and if my skills ever improve, I can try buttonhole stitching over the glue-discolored sections -- maybe with individual plies of yarn rather than thread?
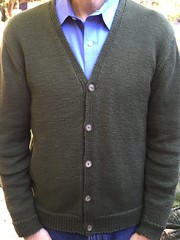
I'm happy with the end result, though. The edge is much sturdier all around. It drapes from my neck better, and the button band doesn't gap any more. I'm glad I went outside my comfort zone and tried this. I learned a lot -- maybe more about what NOT to do -- but I'll have a better idea how to approach this next time.
I really need to get a machine and learn to sew.


