All parts of the Redford Sweater are knit up! Last night I blocked everything and today the seaming begins. This could take much of the weekend.
Tony expressed interest in how I was going to join stockinette and reverse stockinette. I was curious myself, having never attempted this maneuver. It's made even more complicated by the fact that the seams are supposed to show, that is, they are expressed, on the right side. I mulled things over, got out my copy of Vicki Square's The Knitter's Companion, and mulled things over some more. It shouldn't have taken so long, but I finally realized that in order for the seam to show on the right side, I had to sew the seam on the wrong side. Simple enough, once it occurred to me.
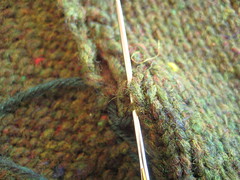

Above you see the wrong sides. The front panel is on the left half of each photo, showing the reverse stockinette side, and a side panel is on the right half of each photo, showing the stockinette side. Yes, the right side of the side panels is reverse stockinette. Is everyone following along so far? To mattress-stitch the seam, I went in to the gaps between the slipped twisted selvedge stitch and the first column of regular stitches. On the side panel, I picked up two bars (left photo) and on the front panel I picked up two "smiles"(right photo). They're really hard to see. I got out my head lamp from my Mt. Whitney climb a few years back. It really helps.
This reminds me of trying to come up with a citation for something that you just can't find an example of in a style guide, where you have to make an educated guess by merging two examples. You librarians know what I'm talking about.
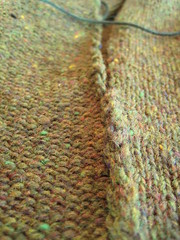
The result of all this is a chunky seam that really shows. This expressed seaming is used to attach the front and back to the side panels and to sew the sleeves into tubes -- although, curiously, none of the photos of the garment in the pattern show those sleeve seams. More traditional seams are used across the shoulders and for setting in the sleeves.
I stopped by a yarn shop to pick up some sturdy sock yarn to do the seaming, but decided to give this bluish-green color that I had from some past project a try. It doesn't show at all, so I think I'll just stick with it. I can always return the sock yarn later -- I only bought one tiny sock's worth, and I'm not all that fond of the color, despite its greenness.
Back to it!
Fascinating! Looks fantastic - can't wait to see the finished product. Have fun!
ReplyDeleteThat yarn looks even nicer closer up, lots of character! The engineering aspects of this sweater are quite fascinating, it seems to be one of the few BT designs knit in pieces, for an obvious reason. I am contemplating a sweater's worth of BT Loft, or Shelter, when I visit NYC next month. Cannot wait to see your sweater finished!
ReplyDeleteNaturally, you worked out how to make those seams show on the public side. I'm a bit disappointed that the pattern didn't give you more support for that, though.
ReplyDeleteLooks great so far!
will you be modeling tomorrow?
ReplyDeleteI wanted to let you know that your blog was extremely useful to me this morning, many years after you posted it, as I struggled over the same seam on the Redford sweater. Thanks so much for sharing your bit of wisdom.
ReplyDelete