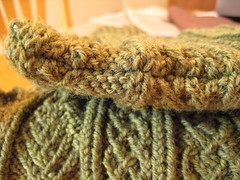
I decided to go with the 3-needle bindoff for the shoulders of the Herz & Baum Vest, which you can see to the right. It was just a matter of using a set-up row to cast of the stitches that wouldnt' be included in the shoulder seems (paying careful attention to the math), and then doing the bind-off. It's not super-tidy, but it does offer the advantage of making the patterns on the front and back meet perfectly. If I'd sewn these seems, I'd have had to play that game where you're always half a stitch off. That would have made my brain hurt. No brain pain for me! It looks like a corner on the left side of the bindoff, but there are actually four cast-of stitches across there for the armhole steeks.
Now, to the steeks. You know how you read the pattern instructions carefully, and then get started, and then, three weeks later when you actually get to some important new structure (like a steek), you think you know all that already? Can you imagine the problems this might cause? I thought so. I forgot that the instructions required twisting two rows in the steek so that the crochet run through those rows would be tighter. This method went up the center of a column of stitches, and not across the halves of two neighboring columns. Not so stable without twisted stitches. Well, that was out -- maybe I could try it without the twisted stitches, but I was scared. Then I thought, "No problem, I'll just use
Eunny Jang's instructions for crocheted steeks, which I'd used before on a
tea cozy." But that method requires an odd number of steek stitches. Grrr...
So I waited all week until I could consult with the geniuses at knitting. One option we came up with was unbinding the bindoff, then laddering the two rows down and twisting them with a crochet hook and then rebinding off. Tedious, but do-able. Then, knitting genius
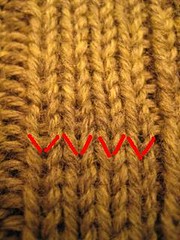
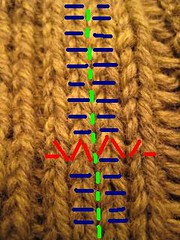
Staci pointed out that if I just turned the vest (and that frown) upside down, I'd have an odd number of stitches across the steek -- 4 would become 3. So simple, so easy. All I had to do was start the crochet chain at the opposite end of the steek I'd planned. The picture to the right shows in red the "V"s of the three stitch rows (with a little left over on each side. The blue lines show the neighboring halves of stitches that will be bound together by the crochet chain, and the green dotted line shows where the final act will take place.
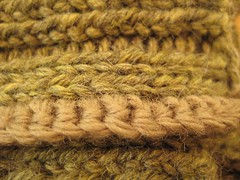
I've begun the chain already. I was going to use the same yarn, but then I chickened out and found some similar Cascade 220 green yarn (I know you're shocked that I had this), and got started. Ideally, I'd have a little more wiggle room. When I'm done crocheting each side, I'll have a knit and a purl stitch left to fold under. I'm hoping this will give me enough sturdiness for picking up the stitches necessary for the neck and armhole bands. I'm knitting the chain fairly tightly with a pretty small hook, so I think I'm good.
If I can get up the nerve, I might post a video of the slicing. Don't worry, Jene, I'll be sure and save some for you to see live and in person.
oh, yes, please, please let me watch the snipping. it may run a close second to watching the birth of a baby.
ReplyDelete~ Jene
I still refuse to cut my knitting...
ReplyDeleteI'm not so sure that you and I have the same concept of what "brain pain" is.
ReplyDeleteGood luck with the snipping!
I'm not sure I've seen the crochet version before, so I'd love to see a video - because thsi already looks really complicated and scary! Good luck!
ReplyDelete