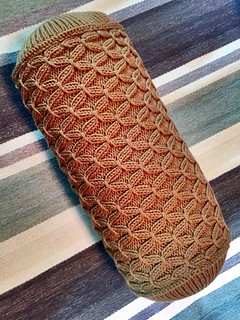
A flash of genius and a little help from my friends helped me all but finish my Smocked Rib Stitch Pillow this weekend.
I had some real hiccups with this, mostly because I was making it up as I went along. The crochet provisional cast on worked, but it didn't unzip correctly. Which I should have anticipated if I'd thought a bit harder about it. Flipping the yarn back and forth over the chain to k2p2 meant pulling all the yarn through a loop every other stitch when trying to remove it. What should have taken 3 seconds ended up taking an hour.
Then I tried to focus on seaming the thing together by grafting the 2x2 ribbing. Staci has excellent instructions for doing this, but I just kept messing it up. I have regular stockinette Kitchener grafting so stuck in my head that I couldn't get the rhythm. And the squished together stitches made it hard to see what I was doing. I must have started and stopped four times. I grumbled about this with my knitting crew, and they convinced me that a 3-needle bind-off would work just fine. And they were right. Not totally invisible, but not too jarring. And it's a tube, right? The seam can always be rolled out of view.
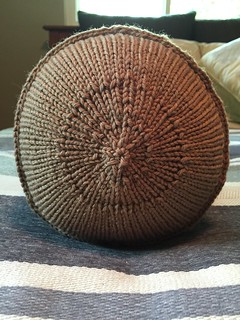
The part I was on my own with was the end caps. I wanted round pieces, which aren't the easiest thing to do in knitting. I toyed with the idea of crocheting round pieces, but thought the styles would be too different. So I went with Elizabeth Zimmerman's pi method, wherein the number of stitches is doubled after the number of rows has doubled. I'm sure I learned some theorem or proof about this in Mr. Ashorn's geography class back in high school, but if so I've since forgotten. The basics are:
- Start with 8 stitches
- Knit a round (2 rds) then double the no. of stitches (16 st)
- Knit until 4 rds from previous increase then double the no. (32 st)
- Knit until 8 rds from previous increase then double the no. (64 st.)
- Knit until 16 rds from previous increase then double the no. (128 st)

I ended up knitting one more round just to tidy things up. The 128 stitches around the end panel happened to be only four fewer than the 132 stitches on the selvedge edge of the tube -- 11 repeats of the 12-row motif. I didn't plan this -- math, geometry, gauge and tension just worked out in this case. I couldn't have planned it.
Then I needed to figure out how to get this attached. I had live stitches on the end pieces, which needed to be both bound off and attached, so I did what amounted to a combination gusset pickup and bind off. I put the needle through a live stitch on the end panel, grabbed yarn through a selvedge stitch from the tube, pulled it through both, then bound it off on the next stitch. This created a nice exposed crochet chain edge, that was almost one-for-one between the two pieces. Every 32 stitches I skipped one and the count lined up perfectly.
The first panel was easier than the second, because I had to have the pillow form stuffed inside for the latter. And I don't think I'm quite done. The form poofs out a bit on the ends, making the pillow look like one of those canisters you put in the pneumatic tube at a bank drive-through. I'm thinking of pulling them in with some upholstery buttons.
I like how the smocking pattern makes it look like the pillow is covered with dragonflies when viewed at the angle in the first photo above. Very appropriate now that our sultry Texas summers seem to have finally arrived. Hope you're enjoying your summer as much as I am!
No comments:
Post a Comment
Note: Only a member of this blog may post a comment.