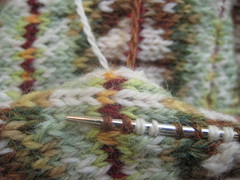
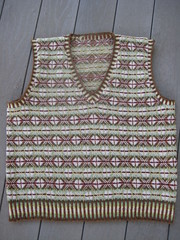
 The Vaila Slipover is done! During the week I did one armhole and yesterday morning I cut the final steek and finished up the second. This was the one with all the knots behind it due to the color changes. It was so refreshing to be able to just snip them all away and not worry about all those ends. I got the armhole ribbing done by late afternoon, wove in some ends, threw the whole thing into some water to soak, and went to a neighbor’s pool party. When I got home, I put it out to block – with LOTS of stretching – and this morning it was dry and ready for its debut. In August.
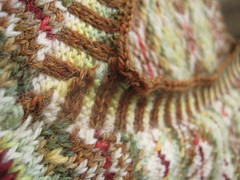
 I’m so pleased with how this turned out. Despite the many anxieties I had about colors and weaving in and gauge and all those other things, this went relatively smoothly. And, it didn’t take as long as I thought it would. I didn’t work all that steadily on it; there were a few Mondays-through-Fridays where I didn’t touch it. About seven weeks start to finish, which isn’t too bad. I actually started thinking toward the end that I might have enough yarn left over to put some sleeves on this thing, but I was kind of ready to be done and when I realized I would have to chart out the sleeve pattern on my own, I quickly abandoned the idea.
While working on this, two great 20th century figures who knew how to work the Fair Isle look came to mind, and for fun, I thought I might model the sweater with these two gentlemen in mind. I know I’m going to regret this…
 The first is the future Edward VIII during his Prince of Wales days. This portrait of him and what I’m guessing is a Cairn Terrier, appeared in the Illustrated London News in November of 1925 and helped popularize Fair Isle garments in Britain during the 20s and 30s. Of course this is a long-sleeved version (pullover vs. slipover?), but I like how the ribbing around the collar and waist are very similar to the Ann Feitelson pattern I just completed. Clicking this picture should take you to more information at the website for the UK’s National Portrait Gallery.
 I don’t have a Cairn Terrier, but in a pinch, a Basenji (this is Kate) works just fine. Pona doesn’t look nearly so composed or graceful when being carried (think baby giraffe), so I went with Kate. It was already a bazillion degrees outside, so we had to work fast. And those are shorts I’m wearing, not heavy wool pleated trousers like I’m sure HRH is wearing. I almost went looking for a cool hat like that, but then decided it just wasn’t worth the trouble for one shot. I really like this picture though. Kate is quite stunning in it! (Thanks, Jeff!). Also, be-heathered Scottish braes are hard to find around here, so we had to go with a background of house.
 The second great icon of 20th century Fair Isle fashion is Our Onslow from Keeping up Appearances. Onslow is often seen wearing a sleeveless t-shirt or one of these sleeveless Fair Isle vests, which his stuffy sister-in-law Hyacinth is always trying to get him cover up with a jacket or something. Onslow has let himself go a long time ago, but he can strike up a conversation with anyone, is addicted to the horse races, loud television and crisps (smoky bacon flavor!), and has a keen interest in theoretical physics. What’s not to like?
 So I thought I’d give it a shot. I don’t run around in heavy construction circles, so I don’t have access to a Fulton Hogan hat, but I did have one in a similar blue. I don’t think I could dress like this in real life, but I love that Onslow does. He must dress like this more often – note his lack of and my abundance of farmer tan! I remember several episodes in which Onslow and Daisy’s large dog, who usually lives in the abandoned car in the front yard, was stretched across Onslow’s lap (and sometimes Hyacinth’s, to her dismay). I started to see if I could replicate this with Kate, but I think she’d had enough modeling for one day.
“Aw, nice!”
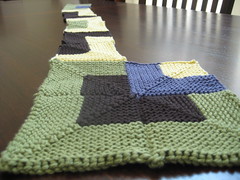 12 down, 88 to go.
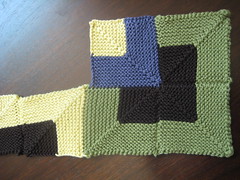 I had to start several squares multiple times on the first row. There were a few times where I had to cast on half the stitches, and then figure out how to pick up while the yarn was on the wrong end of the needles. This just involved flipping the needles around, but it took me a long time to wrap my brain around this. In reading Ravelry, I see that others are running into similar confusion. My biggest fear right now is completing and attaching an entire squire only to discover that I put the wrong one in the wrong place. I’m constantly consulting the diagrams in the pattern to try to prevent this. If it happens, you’ll hear about it.